El Poblador is a fully playable Settlers of Catan clone that runs entirely in your terminal. Written in Go by developer vicho, El Poblador is a compete rendition of the iconic competitive board game, which is all about resources, trading, building settlements and blocking your opponents. All of Catan’s core mechanics are accounted for, albeit free of the tactile joy of handling and placing tiny wooden blocks in the real game. It’s a game designed for 3-4 players, so you’ll want to huddle around a laptop or on a PC to play it. You use arrow keys to navigate the […]
The Ghostty terminal is now packaged in the Ubuntu 26.04 LTS repositories – meaning for those on the new long-term support release, it’s only an apt install away. Ghostty is a fast, open-source terminal emulator for macOS and Linux (Windows support is seemingly trapped between planes), made by Mitchell Hashimoto. It’s picked up millions of users since its launch in December 2024, and has been available on Ubuntu via a community-maintained PPA, DEB and Snap packages for a while. This is its first appearance in the Ubuntu repos proper. What makes Ghostty different? “Ghostty is a fast, feature-rich, and cross-platform […]
There is simply no shortage of terminals for Linux. And yet we keep on seeing new terminals coming up almost every year.
The regular terminal works but then there are terminals like Kitty and Ghostty that provide modern features and customization.
In the same regard, foot is also a good terminal worth having a look. It is not a new project. It has been an active player for sevaeral years and yet not many Linux user have heard of it.
Foot terminal
Foot is a fast and lightweight Wayland-native terminal emulator. Older terminal emulators were designed around X11 and later gained Wayland support, while Foot is a terminal emulator designed specifically for Wayland from the beginning. Modern GPU terminals like Kitty or Alacritty instead support both X11 and Wayland as first-class backends.
Let me show you some of the features of Foot terminal that provide significant value to the user.
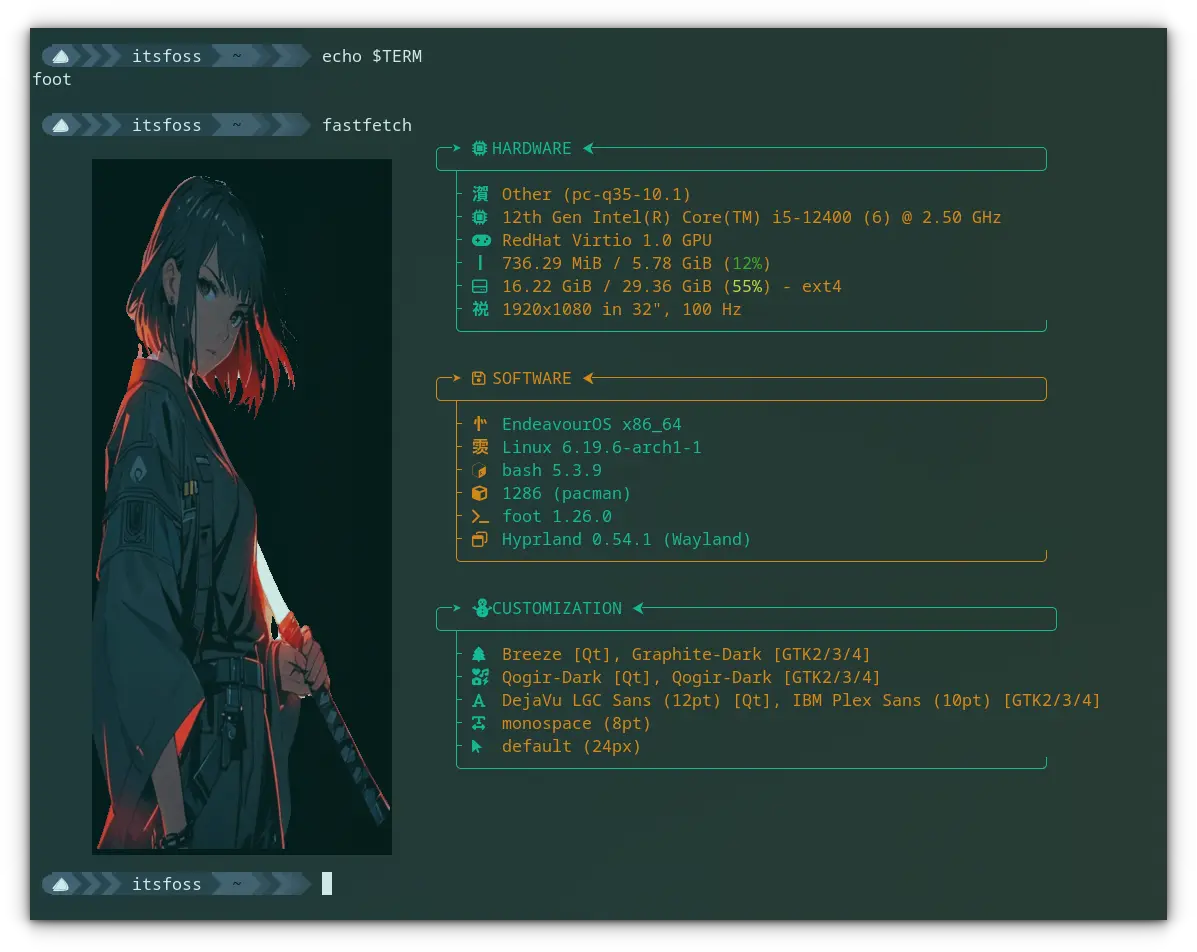
Sixel image support
With the Sixel image support, terminals can display actual images. Foot supports the sixel protocol and thus you can view real images in it without extra effort.
What's the point? Well, if you are using terminal tools like fastfetch, you can display real images in terminal instead of the usual ASCII renderings. Look at the image below for example:
Foot Terminal Image Support
Also, terminal file managers like Yazi can show image file previews in a preview pane with the image support.
Scrollback search
Imagine you executed a command and it produced a long output. Normally, you cannot search in the command output displayed on the screen.
Foot supports scrollback search. If you have a huge scrollback of thousands of lines, the ability to search through it is a game changer.
0:00
/0:32
Using the Scrollback search feature.
Press CTRL+SHIFT+R to search a scrollback history. You will get a search prompt at the bottom-right of your screen. Enter search string and you can see that results are live updating.
Keyboard-driven URL detection
Some terminal output may contain URLs. For example, I use hyperlinks in markdown notes and preview them using Glow. In this case, I can press the shortcut CTRL+SHIFT+O to highlight links.
When you press the shortcut, you can see that small alphabetic characters are attached near the links. Press the associated character, and that link is opened in your default web browser.
🗒️
I use Qutebrowser as my main browser. It also follows a similar hyperlink navigation, so everything feels cohesive.
You can press the ESC key to quit the URL mode.
A clip showing opening links using URL mode in Foot terminal emulator.
Server-daemon mode
In server-daemon mode, one process hosts multiple windows. It offers reduced memory footprint, reduced startup time, etc.
But do remember, if the main process crashes, all windows go down with it.
To get server mode in Foot, start the foot server along with desktop login. That is, you need to auto-start the command:
You cannot write a configuration if you don't know what modules are available for you to customize. Don't worry! Foot provides a concise description of available modules in a separate man page. Open a terminal and use the command:
man foot.ini
Read the page once before starting to configure.
Options that you may require
In this section, we will see some of the useful configuration keys.
Change the Shell
The shell option sets a different shell to the Foot Terminal without altering the default system shell.
The syntax is shell = /usr/bin/zsh. You can use the which command to find the path to the shell to use.
Change Font
Changing font is one of the most important parts of any customization. And Foot provides the font- variables for the purpose:
font = IBM Plex Mono:size=14: Sets the font to IBM Plex Mono and sets the size to 14.
font = Ubuntu Mono:wieght=bold:size=14: Sets the bold font to Ubuntu Mono and sets the size to 14.
font = JetBrains Mono:weight=bold:slant:italic:size=14: set the bold-italic font to JetBrains Mono and size set to 14.
Include another config
Splitting up the configuration will enable you to maintain and modify it easily in a later stage. And this is the best approach for theme customization.
For example, let's see how you can set a Catppuccin Mocha theme to the foot terminal.
Visit the Catppuccin Foot theme GitHub repository. Go to the themes/catppuccin-mocha.ini file and download it using the download button at the top of the page, as shown in the screenshot below.
Now, create a directory with the command:
mkdir -p ~/.config/foot/themes/
Paste the downloaded catppuccin-mocha.ini file inside this directory. Assuming you have downloaded the file to the ~/Downloads directory, use the command:
Now, we need a little troubleshooting. With the latest update, Foot color schemes need a [colors-dark] module, and the Catppuccin comes with [colors]. Just open the file:
nano ~/.config/foot/themes/catppuccin-mocha.ini
And edit the [colors] to [colors-dark] and save it.
One more step. Open the foot.ini config file in your favorite editor:
nano ~/.config/foot/foot.ini
Add the below line to the top of the file:
include ~/.config/foot/themes/catppuccin-mocha.ini
Also, comment out all the blocks, including and under [colors], [colors-dark] inside it the foot.init file.
That's it. Reopen Foot Terminal and enjoy the new themes.
I let you try it and discover more of its features.
Foot: The Wayland Terminal Most Linux Users Don’t Know About
Microsoft hat mit Edit einen neuen, quelloffenen Texteditor für die Kommandozeile vorgestellt. Das unter der MIT-Lizenz veröffentlichte Projekt ist nicht nur für Windows, sondern auch für Linux verfügbar. Zudem nicht nur für PCs, sondern auch für die ARM64-Architektur, wie sie auf dem Raspberry Pi genutzt wird. Der Editor richtet sich an Nutzer, die ein einfaches, schnelles Werkzeug für das Bearbeiten von Textdateien im Terminal suchen. Microsofts Edit reiht sich irgendwo zwischen Nano, Micro oder Kilo ein.
Kompakter Editor für den Terminaleinsatz
Edit ist ein schlanker Editor mit Text User Interface (TUI), der insbesondere auf Portabilität und geringe Abhängigkeiten ausgelegt ist. Die Software setzt auf eine eigene TUI-Bibliothek, die laut Projektentwickler besser zu einer geplanten Plugin-Schnittstelle auf Basis einer C-ABI passt. Außerdem wurde Wert auf UTF-8-Unterstützung, kompakte Dateigröße, VT-kompatible Ausgabe (für bessere SSH-Kompatibilität) und statische Kompilierung gelegt. So lässt sich das Programm ohne Abhängigkeiten ausführen.
Der Editor wurde in Rust geschrieben, nachdem erste Prototypen in C, C++ und Zig entstanden waren. Die Entscheidung für Rust fiel, weil die Sprache innerhalb Microsofts bereits offiziell unterstützt wird und sich gut für systemnahe Programmierung eignet. Der Editor ist natürlich für Windows-Admins interessant, weil man sich seit Windows 10/Windows Server 2019 via SSH auch auf Windows-Kisten einloggen kann. Für administrative Aufgaben braucht es dann auch einen effektiven Editor.
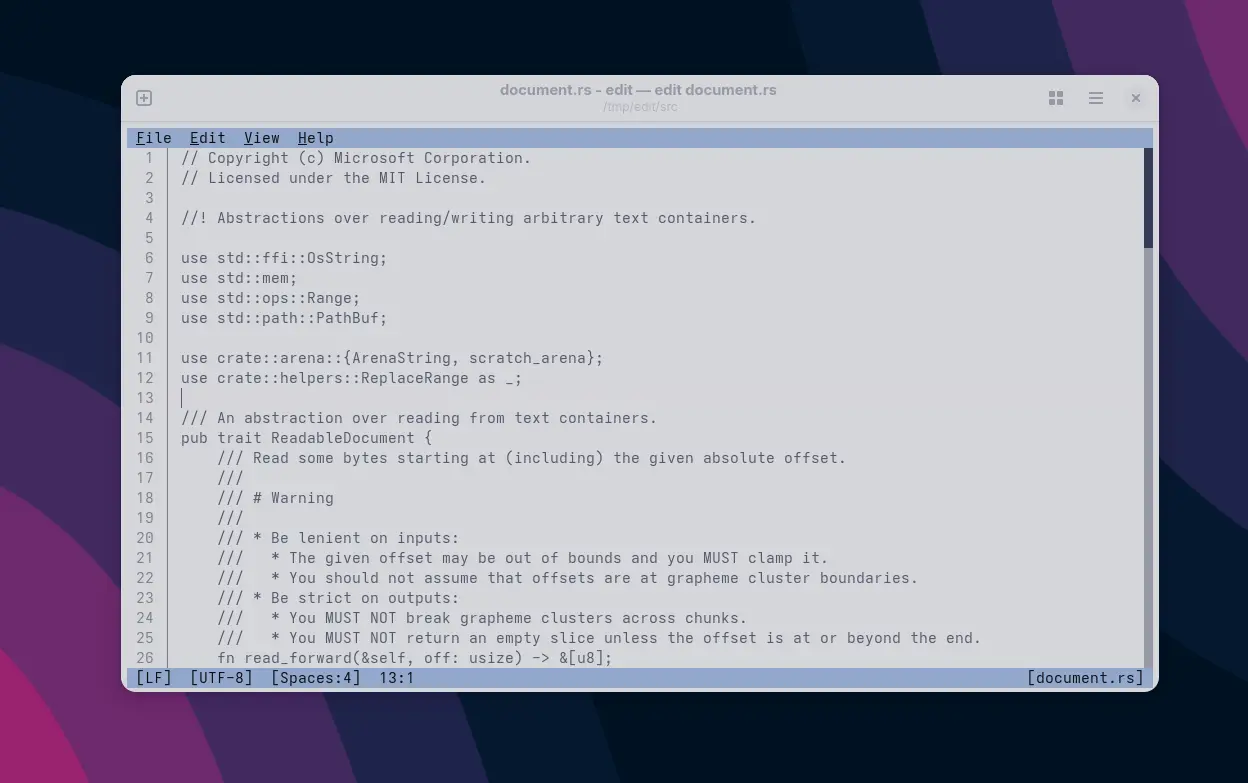
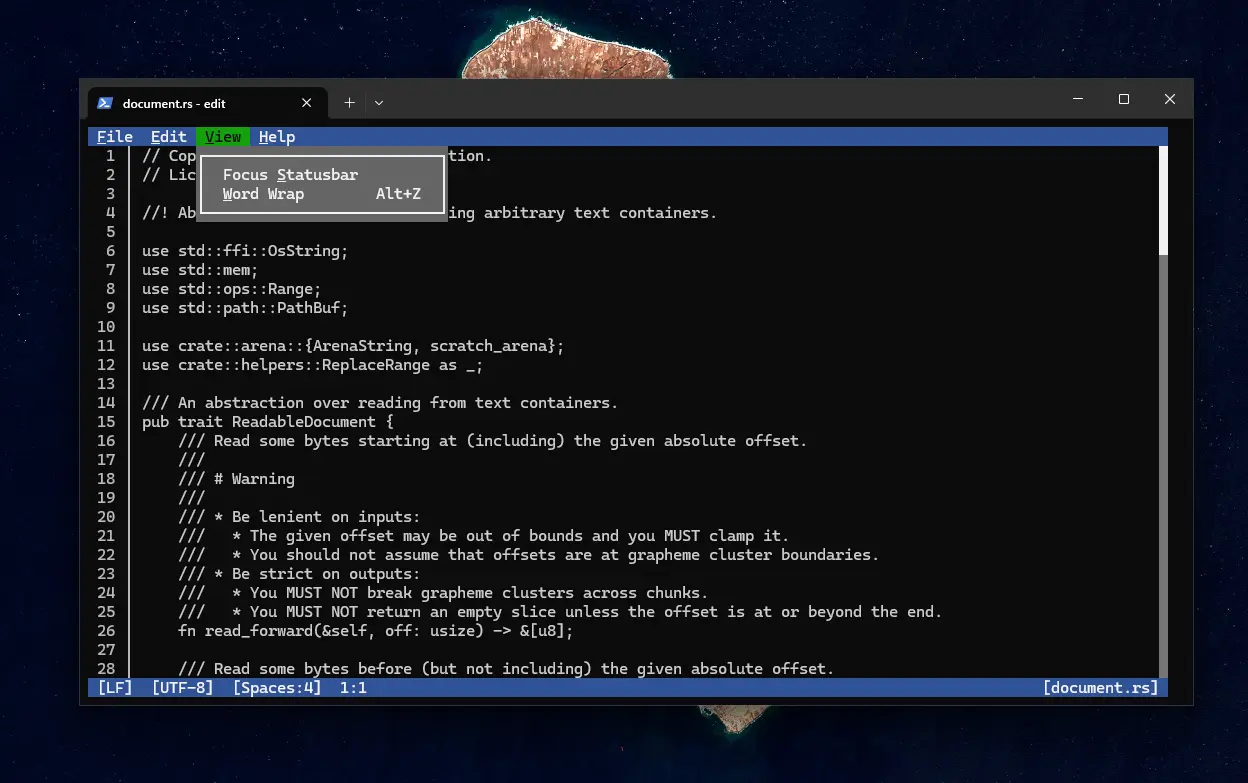
Microsoft Edit unter Linux: Das kompakte, statisch kompilierte Binary läuft direkt im Terminal und eignet sich besonders für den Einsatz über SSH oder in minimalen Systemumgebungen.Microsoft Edit unter Windows im Einsatz: Der Editor bietet eine textbasierte Benutzeroberfläche (TUI) und erinnert optisch an klassische Werkzeuge wie den MS-DOS-Editor oder Nano.
Veröffentlichung auf GitHub
Der Quellcode sowie vorkompilierte Binaries sind auf GitHub unter github.com/microsoft/edit verfügbar. Für Linux steht ein statisch gelinktes Binary bereit, das ohne weitere Abhängigkeiten ausgeführt werden kann:
Im Arch User Repository (AUR) stehen mehrere inoffizielle Pakete zur Verfügung, unter anderem edit, ms-edit, ms-edit-bin und microsoft-edit. Ich möchte hier keine Empfehlung ausgeben, mit Sicherheit wird hier in den nächsten Tagen ein wenig aufgeräumt. Dazu kommen Kochrezepte mit der Endung -git, die das Programm aus dem Quellcode bauen.
$ yay -Ss microsoft edit
aur/edit 1.0.0-1 (+0 0.00)
    A simple editor for simple needs (Microsoft Edit)
aur/ms-edit 1.0.0-1 (+1 1.00)
    A simple editor for simple needs (Microsoft Edit)
aur/ms-edit-git 1.0.0.r1.ge8d40f6-1 (+2 1.98)
    A simple editor for simple needs (Microsoft Edit)
aur/ms-edit-bin 1.0.0-1 (+3 2.99)
    A simple editor for simple needs (Microsoft Edit)
aur/microsoft-edit-git 1.0.0.r1.ge8d40f6-2 (+1 1.00)
    Modern version of the MS-DOS Editor with a modern UI and keybindings similar to VS Code
aur/microsoft-edit 1.0.0-2 (+2 1.99)
    Modern version of the MS-DOS Editor with a modern UI and keybindings similar to VS Code
Entwicklung aus Eigeninitiative
Der Editor entstand im Rahmen eines internen Microsoft-Projekts, wurde jedoch größtenteils in der Freizeit des Entwicklers umgesetzt. In einem ausführlichen Kommentar auf Hacker News beschreibt der Autor Hintergründe zur Entstehung, den Technologiestack sowie die Beweggründe für die Eigenentwicklung anstelle der Verwendung bestehender TUI-Editoren. Einen neuen Editor für Linux-User zu schaffen, stand allerdings nicht auf dem Zettel. /s
Ziel sei es unter anderem gewesen, ein möglichst kleines Binary mit guter Unicode-Unterstützung bereitzustellen, das systemnah arbeitet und sich auch für automatisierte Systemumgebungen oder Remote-Shells eignet. Ob sich Edit langfristig gegen etablierte Editoren behaupten kann, bleibt abzuwarten. Der Fokus auf Minimalismus, Portabilität und UTF-8-Kompatibilität dürfte insbesondere in reduzierten oder serverseitigen Umgebungen relevant sein.
We’re seeing something of a terminal emulator renaissance of late, with developers eager to reimagine, rethink, and rewire the humble console to leverage modern hardware, GPU acceleration, containerised workflows, and (in some cases) AI/LLMs. Ghostty, a new open-source and cross-platform terminal application created by Mitchell Hashimoto (co-founder of HashiCorp) is the latest to join the fray. Hashimoto’s says he “set out to build a terminal emulator that was fast, feature-rich, and had a platform-native GUI while still being cross-platform.” The first public release materialised over Christmas, rather like a festive Dickensian spook seeking to give us a glimpse into the […]
Ich bin gerade in der Situation, dass ich meinen Arbeitsplatz ein wenig umgestalten möchte. Die Monitoren sollen nicht mehr nur einfach auf dem Schreibtisch stehen, sondern auf einem Gestell an den Tisch geklemmt werden — Ergo: mehr Platz auf dem Tisch. Nun gilt es dabei ein paar Dinge zu beachten. Etwa die Frage, wie schwer meine Monitore eigentlich sind. Da ich keine Lust habe alles abzubauen und die Geräte auf die Waage zu stellen, wäre es recht nett zu wissen, vor was für Geräten ich da eigentlich täglich sitze. Da Information könnte ich sicherlich aus alten Rechnungen herauskramen, doch das geht sicherlich auch ein wenig cleverer.
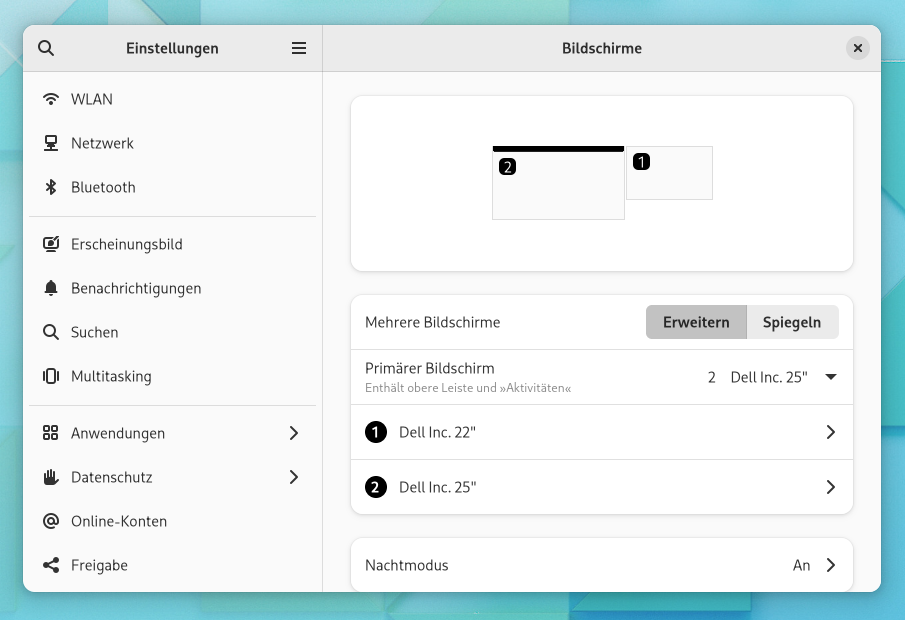
Das Logo des Herstellers glitzert mir auf der Frontseite des Gehäuses entgegen, doch weitere Informationen zum Gerät finden sich dort nicht. Und auch auf der Rückseite gibt es keine weiteren Details. Ein Schildchen mit der Typenbezeichnung gab es in der Regel bei den guten alten Röhrenmonitoren, doch bei meinen aktuellen Dell-Flatscreens findet sich dort nichts mehr. Auch die Monitor-Einstellungen der Gnome-Desktopumgebung lässt den Nutzer im Stich. Die zeigen nur dann Informationen zum Typ des Monitors an, wenn zwei Displays angeschlossen sind. Mehr als den Hersteller und die Bildschirmdiagonale erfährt man jedoch nicht.
Gnome geizt mit Informationen
Hat man nur einen Monitor am Rechner angeschlossen, zeigt Gnome rein gar nichts zum Display an.Bei zwei angeschlossenen Geräten erhält man wenigstens Informationen zum Hersteller und zur Größe.
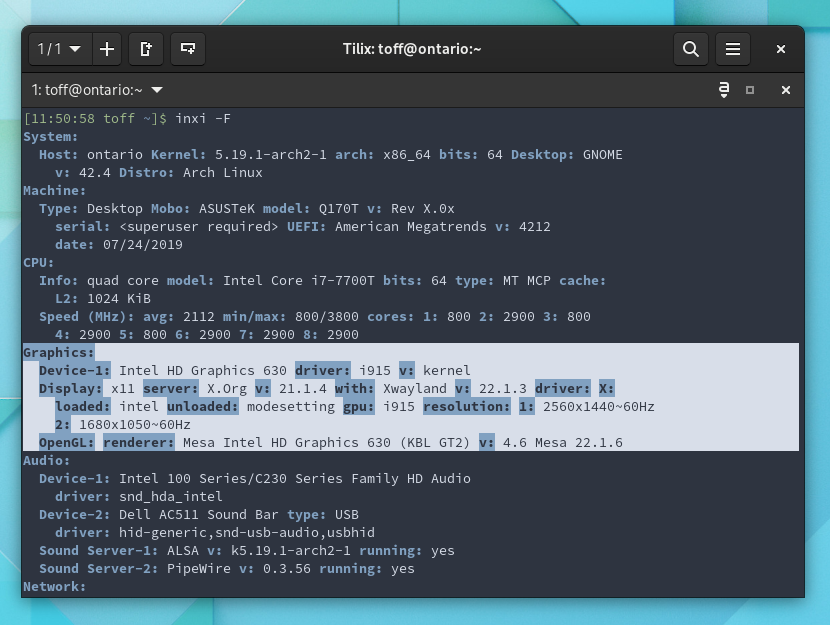
Wenn die grafischen Tools so sparsam mit Informationen sind, dann hilft doch sicherlich das Terminal. Tools zur Anzeige von Hardware-Informationen gibt es unter Linux ja wie Sand am Meer, da müsste doch was dabei sein. Das Go-To-Werkzeug für diese Aufgabe wäre hier Inxi, das sich bei vielen Distributionen aus den Paketquellen installieren lässt (etwa via pacman -S inxi bei Arch Linux oder apt install inxi bei Ubuntu, Debian und Derivaten). Das Kommando inxi -F spuckt dann sämtliche Details zum System aus, aber auch hier Pustekuchen: keine Details zu den angeschlossenen Monitoren.
Auch das Hardware-Analyse-Tool Inxi gibt keine Details zu den Monitoren aus.
Details zum Monitor über das Terminal
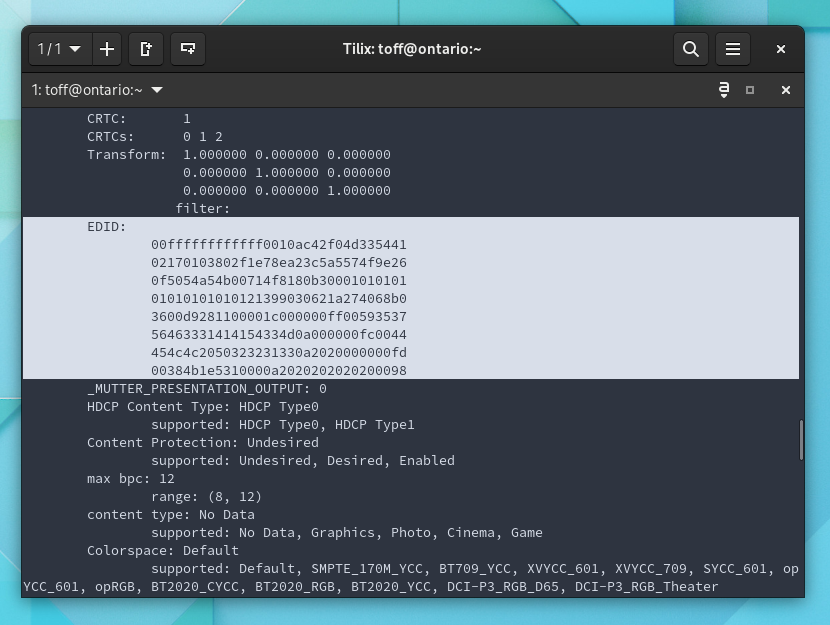
Um mir eine weitere Suche unter den zahlreichen Tools zu ersparen, greife ich nun gleich auf das „richtige“ Werkzeug zurück. Details zum Displayserver liefert das Kommandozeilenwerkzeug Xrandr. Tools wie Inxi machen in der Regel nichts anderes, also solche Kommandos auszuführen und die Ausgabe optisch aufgewertet anzuzeigen. Über xrandr -q --verbose bekommt man also zahlreiche Details zu den unterstützten Auflösungen und Wiederholraten, doch der Name und Typ des Monitors fehlt immer noch. Aber nicht ganz: Die Daten sind im Feld EDID oder Extended Display Identification Data codiert.
Xrandr liefert endlich Details, diese sind allerdings kryptisch verschlüsselt.
Wer diese Daten nun jetzt nicht von Hand decodieren möchte, muss sich ein wenig unter die Arme greifen lassen. Das bei Stack Overflow gepostete Skript beispielsweise braucht keine weiteren Helferlein, um die EDID zu dekodieren. Ihr speichert folgenden Code einfach als monitor.sh ab und macht die Skriptdatei via chmod +x monitor.sh ausführbar. Aus dem Terminal heraus aufgerufen, zeigt das Skript dann die angeschlossenen Monitore inklusive den Namen des Herstellers und der Typenbezeichnung an. Technische Details zu Auflösungen oder Wiederholraten fehlen, doch die lassen sich ja auch an zahlreichen anderen Stellen ermitteln.
Alternativ holt ihr euch das Paket edid-decode auf den Rechner. Bei Ubuntu/Debian oder Linux Mint direkt über die offiziellen Paketquellen (via apt install edid-decode), bei Arch Linux oder Manjaro lediglich über das AUR (etwa mit einem AUR-Helper via yay -S edid-decode-git). Hier genügt dann der folgende Einzeiler, der allerdings nicht mit dem proprietären Nvidia-Treiber funktioniert. Hier bekommt ihr dann allerdings nicht nur den Hersteller und den Monitortyp angezeigt, sondern auch gleich die Seriennummer der Geräte — falls ihr an diesen Interesse haben solltet.
$ for file in $(ls -1 /sys/class/drm/*/edid); do text=$(tr -d 0 <"$file"); if [ -n "$text" ]; then edid-decode "$file" | grep -e Manufacturer: -e Product; sleep 0.0001; fi done
  Vendor & Product Identification:
    Manufacturer: DEL
    Display Product Serial Number: '9X2VY55I0J0L'
    Display Product Name: 'DELL U2515H'
  Vendor & Product Identification:
    Manufacturer: DEL
    Display Product Serial Number: 'Y57VF31AAT3M'
    Display Product Name: 'DELL P2213'
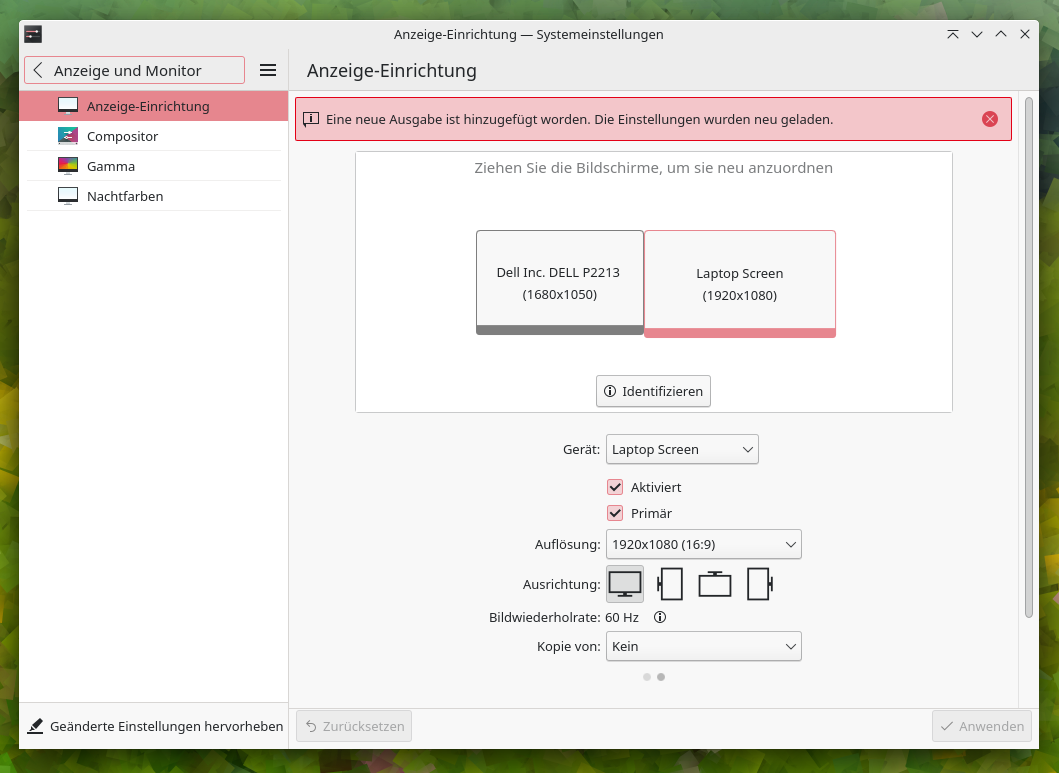
Letztendlich wäre es natürlich schneller gewesen die alten Rechnungen herauszusuchen, oder vielleicht auch mal einen Blick über den Tellerrand zu KDE zu werfen. Im Gegensatz zu den Einstellungen von Gnome zeigen die Systemeinstellungen von KDE nämlich gleich die Bildschirmkennungen mit an. Wie immer ist Gnome ein wenig arg spartanisch und geizig mit Funktionen und Details. In meinen Augen dürften die System-Settings von Gnome ruhig auch die Bezeichnungen ausgeben. Nötig sind sie in der Regel nicht, doch ab und an können sie doch auch praktisch sein.
Die Anzeige-Einrichtung von KDE zeigt die Typenbezeichnung des Monitors im Gegensatz zu Gnome an.
theme.sh is a script to easily change the terminal theme. It comes with more than 400 themes, an optional interactive theme picker, and it's terminal agnostic.
 El Poblador is a fully playable Settlers of Catan clone that runs entirely in your terminal. Written in Go by developer vicho, El Poblador is a compete rendition of the iconic competitive board game, which is all about resources, trading, building settlements and blocking your opponents. All of Catan’s core mechanics are accounted for, albeit free of the tactile joy of handling and placing tiny wooden blocks in the real game. It’s a game designed for 3-4 players, so you’ll want to huddle around a laptop or on a PC to play it. You use arrow keys to navigate the […]