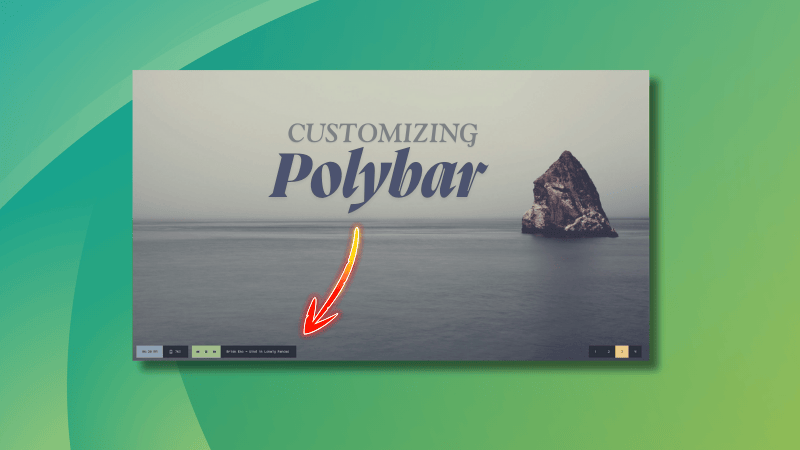
Halloween is here. Some people carve pumpkins, I crafted a special set up for my Arch Linux 🎃
0:00
/0:30
In this tutorial, I'll share with you all the steps I took to give a Halloween-inspired dark, spooky makeover with Hyprland. Since it is Hyprland, you can relatively easily replicate the setup by getting the dot files from our GitHub repository.
wofi: Rofi launcher alternative, but for Wayland. Rofi can be used. In fact, we have some preset config for Rofi in our GitHub repository. But Wofi was selected for this video.
dunst: Notification daemon.
fastfetch: fastfetch is a system information display utility.
starship: Starship is a prompt customization tool.
nautilus: Nautilus is the file manager from GNOME.
Step 2: Install and enable display manager
You need a display manager to login to the system. We use SDDM display manager. GDM also works fine with Hyprland.
sudo pacman -S sddm
Once SDDM package is installed, enable the display manager on boot time.
sudo systemctl enable sddm.service
Enable SDDM
Now, reboot the system. When login prompt appears, login to the system.
Login to Hyprland
Step 3: Install other utility packages
Once essential Hyprland packages are installed and you are logged in, open a terminal in Hyprland using Super + Q. Now install Firefox browser using:
sudo pacman -S firefox
It's time to install theme packages. Hyprland is not a desktop environment in the sense of what GNOME or KDE is. Yet you may still use some apps developed for GNOME (GTK apps) or Qt apps.
To theme, you need to install theme managers for respective system:
nwg-look: To apply theme to GTK apps.
qt5ct: To apply theme to Qt5 apps.
Install these packages using the command:
sudo pacman -S qt5ct nwg-look
🚧
If you are using a minimal installation of Arch Linux, you may need to install an editor like nano to edit file in terminal.
Step 4: Change the monitor settings
In most cases, Hyprland should recognize the monitor and load accordingly. But in case you are running it in a VM, it will not set the display size properly.
Even though we give full configuration at a later stage, if you want to fix the monitor, use the command:
monitor=<Monitor-name>,1920x1080,auto,auto
Monitor settings
It is important to get the name of the monitor. Use this command:
hyprctl monitors
Remember the name of your monitor.
Get monitor name
Step 5: Download our custom Hyprland dot files
Go to It's FOSS GitHub page and download the text-script-files repository.
If you have downloaded the zip file, extract the archive file. Inside that, you will find a directory config/halloween-hyprland. This is what we need in this article.
Step 6: Copy wallpaper to directory
Copy the images in the wallpapers folder to a directory called ~/Pictures/Wallpapers. Create it if it does not exist, of course.
mkdir -p ~/Pictures/Wallpapers
Copy wallpapers
Step 7: Download GTK theme, icons and fonts
Download the Everforest GTK theme dark borderless macOS buttons.
Open the config.jsonc file on the downloaded directory and replace any occurrence of Virtual-1 with your monitor name.
For GNOME Box VM, it is Virtual-1. On my main system, I have two monitors connected. So, the names for my monitors are HDMI-A-1 and HDMI-A-2. Note the name of the monitors as we saw in Step 4:
hyprctl monitors
Now in the Waybar config, change the monitor name from Virtual-1 to the name of your monitor. Change all such occurrences.
📋
You can use any editor's find and replace feature. Find complete word Virtual-1 and replace it with your monitor name. If you are using nano, follow this guide to learn search and replace in nano editor.
Also, take a look at the panel item. If you see any item that is not needed in the panel, you can remove it from the [modules-<position>] part.
👉 Similarly, open the hyprland config in the downloaded directory. Change all reference to Virtual-1 to your monitor name. Similarly, replace monitor name in the hyprlock and hyprpaper config files.
Step 10: Copy and paste config files
Copy the following directories (in the downloaded GitHub files) and paste it to the ~/.config folder.
waybar: Waybar panel configs and styles.
wofi: Application launcher config
dunst: Customized dunst notification system.
starship.toml: Customized starship prompt.
If you are using a GUI file manager, copy all file/folders except hypr, wallpaper, and README.
Copy except hypr and wallpaper
Step 11: Replace Hyprland config
We did not copy hypr folder, because there is already a folder called hypr in every Hyprland system, which contains the minimal config.
I don't want to make it vanish. Instead, keep it as a backup.
Now, exchange the content of the hyprland.conf in your system with the customized content. Luckily, the mv command has a convenient option called -exchange.
What the above command does is swap the contents of your default hyprland config with the one we created.
Backup and replace Hyprland config
Step 12: Paste hyprlock and hyprpaper configs
Now, copy the hyprlock.conf and hyprpaper.conf file to ~/.config/hypr directory.
Copy hyprlock and hyprpaper config files
Step 13: Change themes
Open the NWG-Look app and set the GTK theme and font (Creepster font) for GTK apps:
Set GTK Theme and font
Now, change icon theme:
Set icon theme for GTK apps
This app automatically adds necessary file links in the ~/.config/gtk-4.0. Thanks to this feature, you don't need to apply theme manually to the GTK4 apps.
Open the Qt5ct app and change the theme to darker.
Apply Qt Darker theme
Now, apply icon theme:
Qt icon theme
And change the normal font to "Creepster":
Qt font style
Step 14: Set Starship and aliases
First, paste some cool command aliases for the normal ls and cat command, using the modern alternatives eza and bat respectively. This is optional, of course.
Open ~/.bashrc in any editor and paste these lines at the bottom of this file:
alias ls='eza -lG --color always --icons'
alias la='eza -alG --color always --icons'
alias cat='bat --color always --theme="Dracula"'
Now, to enable Starship prompt, paste the starship eval line to the ~/.bashrc and source the config.
Edit bashrc
eval "$(starship init bash)"

source ~/.bashrc
Customized starship prompt
Once all this is done, restart the system, and log back in to see the Halloween themed Hyprland.
Hyprland Halloween Makeover
Enjoy the spooky Hyprland set up. Happy Halloween 🎃
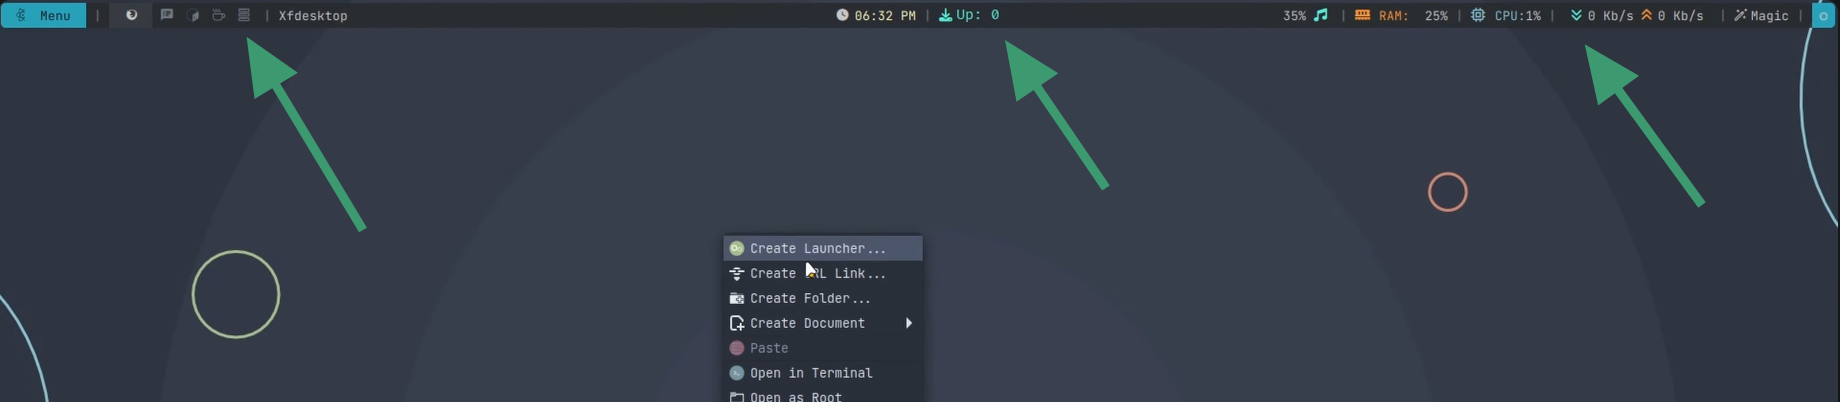
Most major Linux desktop environments like GNOME, KDE Plasma, and Xfce come with their own built-in panels for launching apps, switching workspaces, and keeping track of what’s happening on your system.
Example of top panel in Xfce
One of the best things about Linux is the freedom to customize, and there are plenty of alternatives out there if you want something more flexible or visually appealing for your panel.
Polybar is a standout choice among these alternatives. It’s a fast, highly customizable status bar that not only looks great but is also easy to configure.
If you’re running an X11-based setup, such as the i3 window manager or even Xfce, Polybar can really elevate the look of your desktop, help you keep essential info at your fingertips, and make better use of your screen space.
Example of Polybar in Xfce
We used Polybar in our Xfce customization video and this is from where we got the idea to do a detailed tutorial on it.
In this guide, we’ll build a sleek Polybar panel just like the one featured in our Xfce customization video above. Along the way, you’ll get a solid introduction to the basics of Polybar customization to help you tailor the panel to your own style and workflow.
🚧
This article is not trying to take over the place of Polybar Wiki. You can and should read the wiki while customizing Polybar. This article tries to act as a helper companion for beginners to get started.
Installing Polybar
💡
Most tweaks here are done through the config file at user level. If you get easily overwhelmed and don't like to troubleshoot and fix much, you should probably create a new user account. Or, you could try these things in a fresh system on a VM or on a spare machine. This way, you won't impact your main system. Just a suggestion.
Polybar is a popular project and is available in the official repositories of most major Linux distributions, including Ubuntu, Debian, Arch Linux, Fedora, etc.
If you are a Debian/Ubuntu user, use:
sudo apt install polybar
For Arch Linux users,
sudo pacman -S polybar
In Fedora Linux, use the command:
sudo dnf install polybar
Once you install Polybar, you can actually use it with the default config by using the command:
Let's say you don't want the default config and you want to start from scratch.
First, make a directory called polybar in your ~/.config directory.
mkdir -p ~/.config/polybar
And then create a config file called config.ini for Polybar in this location.
touch config.ini
Now, you have an empty config file. It's time to 'code'.
Config file structure
Polybar config file has a structure that makes things works easier and cleaner.
The whole config can be divided broadly intro four parts.
Colors: Define the colors to use across polybar
Bar: Define the properties of the whole bar.
Modules: Individual bar modules are defined here.
Scripts: This is not inside the config, but external shell and other scripts that enhance the Polybar functionality.
Define the colors
Let me share how I am customizing my desktop Linux with the awesome Polybar. This could work as a beginner's guide to understanding Polybar configuration.It is not convinient to write all the colors in hex code separately. While this is good during rough coding, it will create headaches later on, when you want to change colors in bulk.
You can define a set of general colors in the beginning to make things easier.
The common definition syntax is explained above. Now, to refer to any color in the list, you can use:
key = ${colors.colorvariable}
For example, if you want to set the foreground color in a module, you will use:
foreground = ${colors.foreground}
💡
If you intend to change the entire color palette of the bar, all you have to do is create a new color palette and paste it in the config. No need to change individual colors of all modules and sub-items.
Setting the bar
In simple words, this is the panel appearing in the bar. The one that contains all other modules.
Polybar allows you to have multiple bars. Perhaps that's the reason why it is called 'polybar'. These bars can be named separately in the config file, with their own set of modules.
The bar is placed, defined with the syntax:
[bar/<barname>]
option = value
option = value


[bar/<barname2>]
option = value
option = value
Let’s say I am creating a top bar and a bottom bar, my simple syntax will be:
[bar/mytopbar]
options = values

[bar/mybottombar]
options = value
There will be plenty of options and values to use that you will see later in this tutorial.
Now, if you want to open only the top bar, use:
polybar mytopbar
Configure the bar
You have seen the general syntax of the bar that mentions options and values. Now, let’s see some options.
I am giving you a code block below, and will explain with the help of that.
The main options that you may take a closer look are:
monitor: As the name suggests, this decides on which monitor you want the Polybar. Use the xrandr command to get the name of the display. If you are using a multi-monitor setup, you can define a second bar, placing it on the second monitor and so on.
separator: This is the separator used to separate the modules appearing in Polybar. You can use any item here, including Nerd font items (given the nerd font is installed on the system.).
font-n: These are fonts to be used in the bar. The number corresponding refers to fallback fonts. That is, if the one mentioned first is not available, the other is used. Take special care to the Nerd fonts we have set at font-2 and font-3. This will be explained in a later section.
modules-left, modules-center, modules-right: Keys used to arrange the modules in the bar. Place the module names on any of this section, then that appears in that part of the bar.
enable-ipc: Enable Inter-process communication. This allows scripts or external apps to send commands (like module updates or bar reloads) to Polybar in real time.
The above-mentioned options are enough for a working bar. The rest are mostly self-explanatory. You can read more about other options and more help from the official wiki of Polybar.
Modules
Now that you have placed the bar, it's time to start adding the items.
If you have looked at the above piece of script, you would have noticed that there are some entries in the modules-left, modules-center, and modules-right keys. They are mymenu ewmh, date temperature pacupdate, and pulseaudio memory cpu eth magic-click sessionLogout respectively.
These are calling modules to the bar and placing them in the required position.
In order to call them to the bar, they need to be defined; like what to display at that position. So, our next part is defining the modules.
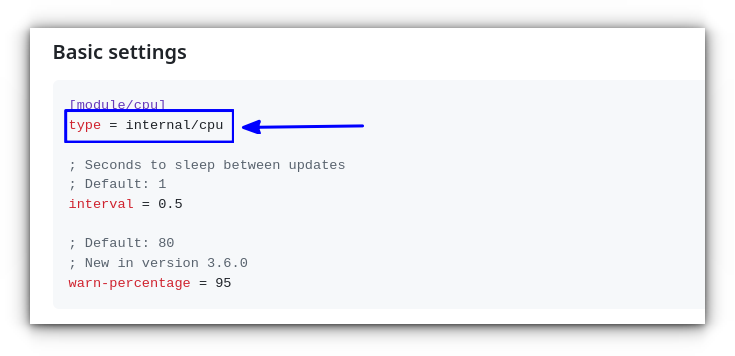
Here, MY_MODULE_NAME can be found on the Polybar Wiki, that explains modules. For example, refer to the CPU module wiki in Polybar.
Getting Module Name
The type here will be:
type = internal/cpu
🚧
I will be using several modules here, that will create a fine panel for a beginner. You should read the wiki for more modules and customizations as required for your needs.
Add Workspaces
Workspaces is a great way to increase productivity by avoiding cluttered windows in front of you. In Polybar, we will be using the emwh module to get workspaces in the panel.
We have already seen what type is in the previous section.
In workspaces, you should be able to see icons/numbers for each workspace. These icons are defined in the icon-n key. The n here corresponds to the workspace number.
For desktops like Xfce, the number of workspaces available is managed by the desktop. So, if you are adding icons for 5 workspaces, make sure you have created 5 workspaces in the system settings.
For example, in Xfce, you can search for Virtual Desktops in the menu and set the number of workspaces available in the system.
The format options tells the bar what to show for which workspace. We have set it as label-state. This means, we will define some states (active, empty, occupied, urgent) for the workspaces and the display will be according to that.
The format-font = 3 tells the polybar to use which font. Here, I have specified 3, that will refer to font-3 defined in the bar section. That is Symbols Nerd Font:size=20;4. Since I have pasted the nerd font logo from nerd fonts, this will be better to display them properly.
This sets the value %icon% when the workspace is active. When Polybar sees the %icon%, it will swap this with the icons defined above. That is icon-N. The rest options are visual changes for each of the state, like background color, foreground color, etc.
If you are using nerd fonts for this, these fonts will change their color according to the set foreground color.
Similar is done as needed for other states like empty, urgent, etc. It is up to your creativity to assign what values to these states to make it visually pleasing.
0:00
/0:06
Switch Workspaces in Polybar
What is the time now?
A panel without a date is useless! Let's add a date block to Polybar.
We need to format it, so that it looks better. So, take a look at the sample code below:
[module/date]
type = internal/date
interval = 1.0
time = %I:%M %p
date = %d-%m-%Y
date-alt = "%{F#FF9535}%Y-%m-%d %I:%M:%S %p%{F-}"
label = %date% %time%
label-font = 5
label-foreground = ${colors.aurora-yellow}
format = <label>
format-prefix-font = 2
First is the refresh rate. We set the click to refresh every second with the interval = 1.0. The value is in seconds.
Next, define what to show with the time key. It has to be in a format strftime. You can read the full format specification in the man page here.
For now, we are using the format %I:%M %p, that will show the time as 12:30 PM.
We are going a bit further to show you that there are more with date module.
Use the date key to set the date format. I am using the format %d-%m-%Y, which will output 25-07-2025.
The date-alt key can be used to show another date format when you click on the date module in the bar.
💡
You can remember like this; if there is an alt in the name of a key, then it define an action that is available upon clicking that module.
The syntax %{F#RRGGBB} in Polybar is used to set the foreground color dynamically within the module’s label or format string. This is like <span> tag in the HTML codes.
So this will tell Polybar “from here on, use this foreground (text) color,” and once the %{F-} is spotted, reset it to general flow, or what was before.
So, according to the code, when we click on the date module, it will show the detailed date format as %Y-%m-%d %I:%M:%S %p, which in real world, 2025-07-25 12:30:25 PM.
0:00
/0:07
Showing date in Polybar with an alternate format
The label = %date% %time%, make sure the bar will show date and time properly.
The format = <label> will show the date with a preceding nerd font icon.
It is in the format key, you add icons/glyphs to appear on the bar most of the time.
How do I change the volume?
Most common way to change the volume in most system is to scroll on the volume button on panel. This is possible with Polybar as well.
As you expected, type = internal/pulseaudio is the module type.
The next entry to look is format-volume. Here, we see a new item called <ramp-volume>. And if you look further down the code, you can see I have defined 9 levels (0 to 8) of ramp.
This ramp-<item> is available in some other module also. So, understanding it here is better to use them as required. For example, the cpu module give a ramp-coreload, memory module gives ramp-used and ramp-free, etc.
It shows a visual volume indicator (like volume bars or icons) depending on the number of ramp levels. For example, in the above volume, the 100% volume level is divided into 9 equal ranges. So, when the volume is increased, an appropriate bar is shown.
0:00
/0:10
Change the volume with ramps
Another useful options are the mouse-click items. Generally, you have three of them available:
click-left
click-middle
click-right
It is not limited to pulseaudio, you can use it in some other modules also. For that, refer to the wiki page.
Tray
Many apps needs an active tray module to work. Discord, Spotify, Ksnip, Flameshot, all provides a close to tray option as well.
In Polybar, you will be using the tray module for this purpose.
[module/tray]
type = internal/tray

format-margin = 8px
tray-spacing = 8px
It has several option you can try, in the official wiki. Rewriting them here is not an efficient way, since a bare module serves most purposes.
🚧
In Linux systems, only one panel can take the tray. So, you only needed to add it in one tray. Similarly, in Xfce and other distros, which by default offers a panel with tray, using the tray module will not work properly.
Scripts and Custom Module
This is not the scope of this article to explain bash shell scripts/ python scripts. But we will see custom modules in Polybar, that you can use to extend the function to next level.
But, with Polybar, you can create shell scripts and then use it at places in modules. For example, take a look at the code below, that defines a custom module to show any package update available in Arch Linux:
As you can see, I got the type as custom/script from the wiki for scripts.
Check the exec field. It points what to execute in the module. This can either be a simple command or point to the path to a script. Here, I pointed it to a script called pacupdates located on my ~/.config/polybar/ directory.
The contents of the script is available in our GitHub repo. What it does is check and tell whether any package update is available.
0:00
/0:06
A custom script that will print what updates is available in the system when clicked on it
This is not an in-built module in Polybar. We have created it. With that, let's see a general syntax for custom modules:
Take a look at the lines on code in that files and get a better grasp of Polybar config.
I hope you liked this detailed guide to Polybar customization. If you have any questions or suggestions, please leave a comment and I'll be happy to answer them.
![Here's How You Can Customize Linux Desktop for Halloween [Dot Files Included]](https://itsfoss.com/content/images/2025/10/halloween-thumbnail-1-.png)
![Here's How You Can Customize Linux Desktop for Halloween [Dot Files Included]](https://itsfoss.com/content/images/2025/10/enable-sddm.png)
![Here's How You Can Customize Linux Desktop for Halloween [Dot Files Included]](https://itsfoss.com/content/images/2025/10/login-to-hyprland.png)
![Here's How You Can Customize Linux Desktop for Halloween [Dot Files Included]](https://itsfoss.com/content/images/2025/10/monitor-settings-initial.png)
![Here's How You Can Customize Linux Desktop for Halloween [Dot Files Included]](https://itsfoss.com/content/images/2025/10/hyprctl-monitors.png)
![Here's How You Can Customize Linux Desktop for Halloween [Dot Files Included]](https://itsfoss.com/content/images/2025/10/download-the-zip-files.png)
![Here's How You Can Customize Linux Desktop for Halloween [Dot Files Included]](https://itsfoss.com/content/images/2025/10/copy-wallpapers-to-folder.png)
![Here's How You Can Customize Linux Desktop for Halloween [Dot Files Included]](https://itsfoss.com/content/images/2025/10/download-gtk-theme.png)
![Here's How You Can Customize Linux Desktop for Halloween [Dot Files Included]](https://itsfoss.com/content/images/2025/10/copy-config-to-location.png)
![Here's How You Can Customize Linux Desktop for Halloween [Dot Files Included]](https://itsfoss.com/content/images/2025/10/backup-hypr-config-and-replace.png)
![Here's How You Can Customize Linux Desktop for Halloween [Dot Files Included]](https://itsfoss.com/content/images/2025/10/copy-hyprlock-and-hyprpaper.png)
![Here's How You Can Customize Linux Desktop for Halloween [Dot Files Included]](https://itsfoss.com/content/images/2025/10/set-theme-and-font.png)
![Here's How You Can Customize Linux Desktop for Halloween [Dot Files Included]](https://itsfoss.com/content/images/2025/10/apply-qt-darker-theme.webp)
![Here's How You Can Customize Linux Desktop for Halloween [Dot Files Included]](https://itsfoss.com/content/images/2025/10/apply-qt-font-creepster.png)
![Here's How You Can Customize Linux Desktop for Halloween [Dot Files Included]](https://itsfoss.com/content/images/2025/10/edit-bashrc-and-add-lines.webp)
![Here's How You Can Customize Linux Desktop for Halloween [Dot Files Included]](https://itsfoss.com/content/images/2025/10/starship-prompt.png)