Linux Mint has confirmed it is switching to a longer development cycle, in order to give the team more time to ‘fix bugs and improve the desktop’. As a result, the Linux Mint 23 release is now slated to launch in December 2026. It will, among other planned changes, use the same installer as LMDE (Linux Mint Debian Edition) as this offers better OEM install, SecureBoot and LVM/LUKS support. Project lead Clement Lefebvre intimated that upending the distro’s standard twice-yearly release model was needed in February, noting that “…one of our strengths is that we’re doing things incrementally and changing […]
Linux Mint is known for being simple and beginner friendly. It works out of the box with most essential features ready to use, so you don’t have to spend time setting things up. One such basic task is taking screenshots, and Mint makes it very easy even if you are completely new to Linux.
In this beginner's guide, we will look at the built-in screenshot tool in Linux Mint and the keyboard shortcuts you can use right away.
📋
This article is part of the Linux Mint beginner's tutorial series.
The GUI screenshot tool that you don't want to miss
Linux Mint provides a simple graphical interface for those who prefer a GUI solution for taking screenshots.
Beyond the basic options, the tool also includes a few useful features. Let’s take a look at them next.
First, open the Screenshot tool by searching for it in the start menu.
Open Screenshot Tool
💡
You can pin the Screenshot app to the taskbar for quick access.
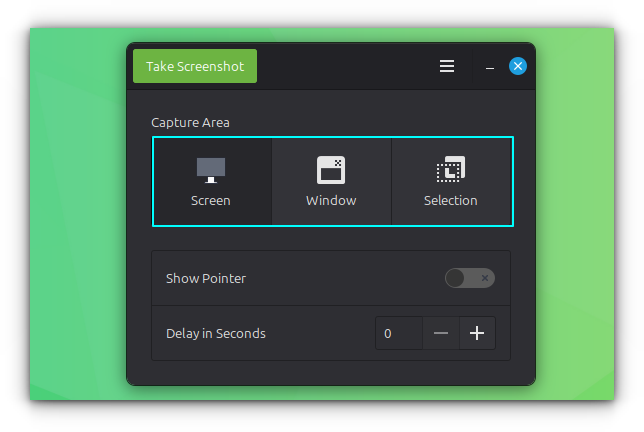
The interface is simple and easy to understand. There are three main options:
Capture Screen: Takes a screenshot of the entire screen
Capture Window: Captures the active window
Capture Selection: Lets you select a specific area using left-click and drag to capture.
Screenshot Tool Interface
After choosing the method, click the Take Screenshot button at the top left of the window.
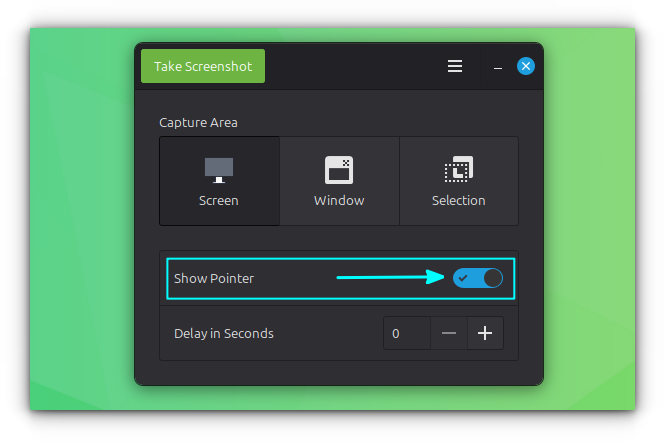
Show mouse cursor in screenshot
In the Screenshot tool, you will find an option called Show Pointer. Enable this if you want the mouse pointer to be visible in your screenshots.
Show Pointer
Take screenshot with a delay
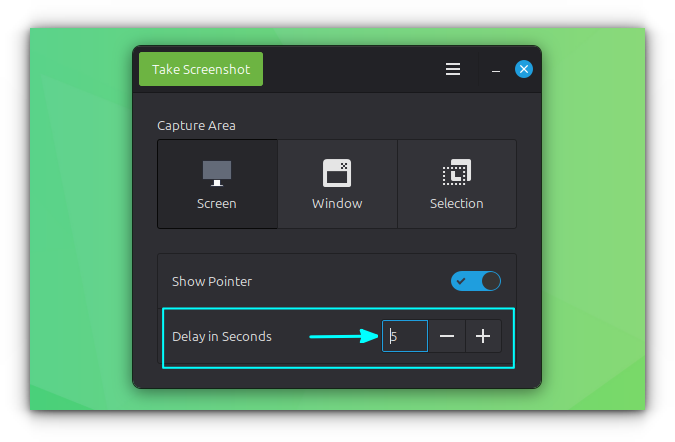
You can also set a small delay before taking a screenshot.
🚧
This does not apply to keyboard shortcuts by default.
In the Screenshot tool, enter a value in seconds under the Delay in Seconds option.
Add a Delay to Screenshot
Once set, the tool will wait for the specified time before capturing the screenshot when using the GUI. For example, if you set it to 5 seconds, the screenshot will be taken after a 5 second delay.
💡
One common use case for delay is capturing the mouse cursor in window or area screenshots. Without a delay, the screenshot is taken instantly, so you do not get time to move the cursor from the Screenshot tool to the target application or position it properly.
Using keyboard shortcuts
If you prefer not to open a GUI app every time you take a screenshot, that is not a problem. Linux Mint provides keyboard shortcuts that let you quickly capture the screen in different ways.
Take the screenshot of entire screen
You can press the PrtScr key on your keyboard to capture the entire screen.
After taking the screenshot, you will be prompted to either save it with a name or copy it to the clipboard. This works well for basic use.
However, this can feel limited if you only want to capture a small part of the screen. The good news is that Linux Mint also provides an easy way to do that.
Take the screenshot of an area
To take the screenshot of a specific area, use the Shift + PrtScr shortcut.
Your screen will dim slightly and the cursor will change to a plus sign. Click, hold, and drag to select the area you want to capture.
Once you release the mouse button, you can choose to copy the screenshot or save it.
🚧
Keep in mind that you cannot adjust the selection after releasing the click, so make sure to select the area carefully.
Take screenshot of a window
Sometimes, you may want to capture only the currently active window. While you can do this using the area selection method, using a shortcut is much more convenient.
Press Alt + PrtScr to take a screenshot of the active window.
There are a few things to keep in mind. If a menu is open inside the window, like a top menu or a right-click context menu, this shortcut may not work.
🚧
In my case, I was not able to use any of the screenshot shortcuts if the window in focus has a menu opened. In this case, you need to set a delay to take the screenshot, which we will see in a later section.
Also, if a dialog box is open, the tool will capture whichever window is active at that moment, whether it is the main window or the dialog.
Record the screen
Many people do not realize that Linux Mint also includes a built-in screen recorder. It is not visible in the menus, so it is easy to miss.
Press Shift + Ctrl + Alt + R to start recording your screen. Use the same key when a recording is active to stop recording.
This is a basic tool, so do not expect features like those in dedicated applications such as OBS Studio or SimpleScreenRecorder. It simply records your entire screen.
When you stop the recording, the video file is saved in the Videos folder inside your Home directory.
Custom Shortcuts
In the previous section, we saw that the GUI tool offers options like delay and showing the mouse pointer, which are not available with the default keyboard shortcuts.
However, this does not mean you are limited. In Linux Mint, you can create custom shortcuts to include these actions as well.
The screenshot options
Before setting up custom screenshot shortcuts, it helps to understand the available options. Linux Mint uses the GNOME Screenshot tool for both the GUI and keyboard based screenshots.
GNOME Screenshot provides several useful options, along with many more that you can explore in its man page.
gnome-screenshot -w: Take the screenshot of current active window.
gnome-screenshot -a: Take the screenshot of a select region by click and drag.
gnome-screenshot -d 5: Add a 5 second delay before taking a screenshot of the entire screen.
gnome-screenshot -d 5 -p: Apply a 5 second delay and include pointer in the screenshot.
gnome-screenshot -d 5 -a, gnome-screenshot -d 5 -w: Take screenshot of select area/window respectively with a 5 second delay.
Setting custom screenshot shortcuts
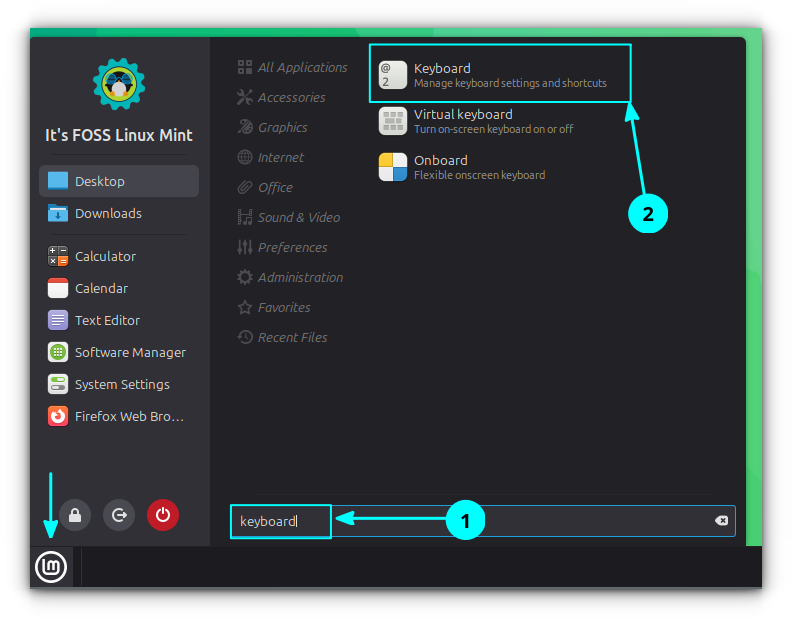
Search for and open Keyboard from the start menu.
Open Keyboard Application
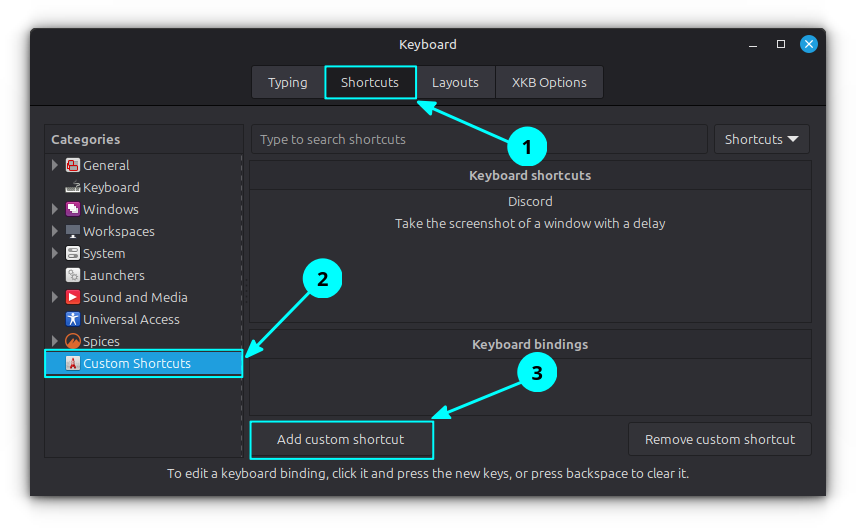
Go to the Shortcuts tab and then select Custom Shortcuts. Click on the Add custom shortcut button.
Add Custom Shortcut
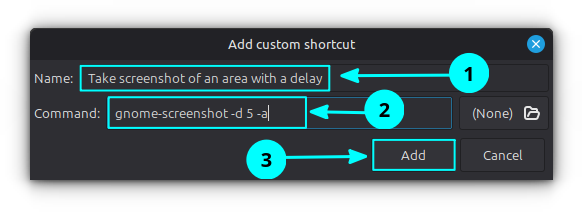
Now, enter a name for the shortcut. For example, you can use "Take screenshot of an area with a delay" in the Name field.
Enter name and command
In the command field, enter the required command. For example, use gnome-screenshot -d 5 -a, and then click the Add button.
The command will now be listed. To assign a shortcut, select it under Keyboard shortcuts and click on the Unassigned option in the Keyboard bindings section.
0:00
/0:13
Add the keybinding to the custom command.
You will be prompted to press a key combination. Press the shortcut you want to use.
You can repeat the same steps to create and assign shortcuts for other commands based on your needs.
Other screenshot tools
Sometimes, basic screenshots are not enough. You may want to annotate an image or add borders and other adjustments.
These are image editing features, and they are not available in the default Screenshot tool in Linux Mint.
For such needs, you can use third party screenshot tools that offer more control and customization.
We have a separate article that covers screenshot tools you can use in more detail. You can refer to it to find options that suit different needs and use cases.
As a quick note, Flameshot and Ksnip are two good screenshot tools you can use for editing and customization. You can also use Gradia that also provides basic editing.
Did you find it useful? Feel free to share your thoughts in the comments.
Linux Mint devs announced that they will adopt a longer development cycle starting with the upcoming Linux Mint 23 release, as well as other important changes to the distribution.
Linux Mint is working on a redesigned screensaver and lock screen for the Cinnamon desktop. Based on our first look, it’s a solid improvement. If the word “screensaver” conjures flying star fields or photo slideshows, that’s fair, but in Cinnamon it also acts as the ‘screen locker’. In 2026, ‘saving’ the screen is less of a concern than ‘locking’ it, but many users enjoy seeing a pretty ‘idle’ display. Cinnamon’s new lock screen will, based on designs shared by Linux Mint, convey more information without you needing to unlock. Battery level, time and date, media player controls and unread notifications […]
Linux Mint 22.2 will die Nutzung von Fingerabdrucksensoren mit einer neuen App vereinfachen. Ebenfalls mit 22.2 wird der LibAdwaita-Fork LibAdapta verfügbar sein.
libadwaita ist bei GTK-Entwicklern nicht allzu beliebt, da es kein individuelles Theming erlaubt. Das hat Clement Lefebvre von Linux Mint zum Anlass genommen, einen Fork zu starten.
Der Linux Mint Report für März 2025 bringt interessante Neuigkeiten. So wird LMDE mit einer OEM-Installation aufgewertet und die Wayland-Integration weiter ausgebaut.
A major new release of Linux Mint is now available to download. Linux Mint 22.1 is the first update in the Linux Mint 22.x series and, like that version, is built on top of Ubuntu 24.04 LTS and uses Linux Kernel 6.8 (though the distro plans to release newer kernel updates more often by opting-in to the Ubuntu HWE). Being based on Ubuntu 24.04 LTS means Linux Mint 22.1 receives on-going updates until July 2029. Though it features few foundational changes, Linux Mint 22.1 brings improvements to what sits on top – a new version of the Cinnamon desktop, Wayland-friendly features, new […]
Noch in dieser Woche soll die Freigabe von Linux Mint 22.1 erfolgen. Die Entwickler haben das Paketmanagement der Distribution erneuert und Cinnamon 6.4 unter anderem optisch aufgefrischt.
Im Blog von Linux Mint hat das Team eine kurze Anleitung zusammengestellt, wie Du von LMDE 4 auf LMDE 5 aktualisieren kannst. Eine Neuinstallation ist dafür nicht notwendig. Zunächst einmal aktualisierst Du die Paketquellen und danach installierst Du das Upgrade Tool. Dazu führst Du auf einem Terminal die nachfolgenden Befehle aus: Danach rufst Du das neue Tool auf, um das Upgrade zu starten: Nun musst Du nur noch den Anweisungen auf dem Bildschirm folgen. Sobald das Ugprade abgeschlossen ist, deinstallierst […]
Der Monatsbericht von Linux Mint für April 2022 ist ziemlich übersichtlich. Allerdings befinden sich darin einige tolle Nachrichten. Die neue mutter-Version für Cinnamon 5.4 sieht gut aus und wird immer stabiler. Außerdem hat das Team angefangen, an der Basis für Linux Mint 21 zu arbeiten. Die Repositories und die Docker-Abbilder sind fertig. Das Team hat ein erstes Pre-Alpha-Abbild erstellt, um potenzielle Probleme zu finden. Laut eigenen Angaben patcht das Team gerade Software und Regressions. Neues Upgrade-Tool sieht gut aus Es […]
Im Dezember 2021 hat das Projekt Spenden von 730 Leuten bekommen und im Januar 2022 waren es 695 Menschen. Das Team freut sich sehr über solche Zahlen. Natürlich helfen die Spenden finanziell, aber laut eigenen Angaben ist es auch eine große Motivation. Im Januar 2022 wurde Linux Mint 20.3 veröffentlicht. Es ist die letzte Version aus der Reihe 20.x., die auf Ubuntu 20.04 LTS basiert. Für den neuen Entwicklungs-Zyklus gibt es schon reichlich Ideen. Weiterhin will das Team bestehende Komponenten […]
 Linux Mint has confirmed it is switching to a longer development cycle, in order to give the team more time to ‘fix bugs and improve the desktop’. As a result, the Linux Mint 23 release is now slated to launch in December 2026. It will, among other planned changes, use the same installer as LMDE (Linux Mint Debian Edition) as this offers better OEM install, SecureBoot and LVM/LUKS support. Project lead Clement Lefebvre intimated that upending the distro’s standard twice-yearly release model was needed in February, noting that “…one of our strengths is that we’re doing things incrementally and changing […]
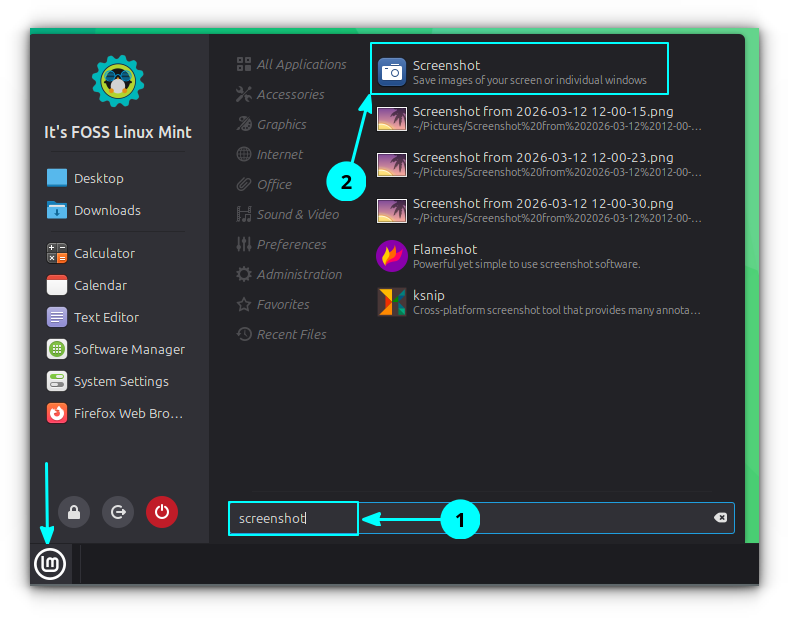

 Linux Mint is working on a redesigned screensaver and lock screen for the Cinnamon desktop. Based on our first look, it’s a solid improvement. If the word “screensaver” conjures flying star fields or photo slideshows, that’s fair, but in Cinnamon it also acts as the ‘screen locker’. In 2026, ‘saving’ the screen is less of a concern than ‘locking’ it, but many users enjoy seeing a pretty ‘idle’ display. Cinnamon’s new lock screen will, based on designs shared by Linux Mint, convey more information without you needing to unlock. Battery level, time and date, media player controls and unread notifications […]
 Linux Mint 23 will expand its System Administration tool (mintsysadm) with a new Users section, enabling post-install home encryption and more.
 A major new release of Linux Mint is now available to download. Linux Mint 22.1 is the first update in the Linux Mint 22.x series and, like that version, is built on top of Ubuntu 24.04 LTS and uses Linux Kernel 6.8 (though the distro plans to release newer kernel updates more often by opting-in to the Ubuntu HWE). Being based on Ubuntu 24.04 LTS means Linux Mint 22.1 receives on-going updates until July 2029. Though it features few foundational changes, Linux Mint 22.1 brings improvements to what sits on top – a new version of the Cinnamon desktop, Wayland-friendly features, new […]
 I check out work on an official Yaru theme for the Cinnamon desktop environment. How well does Ubuntu's stock theme suit this desktop? I find out.