🔒
Es gibt neue verfügbare Artikel. Klicken Sie, um die Seite zu aktualisieren.
✇It's FOSS

7 Features I Like in Ptyxis (The New Default Ubuntu Terminal)

Von: Sreenath

Ptyxis is a modern terminal emulator built with GTK4 and libadwaita. It provides a cohesive look for the GNOME desktop, making it feel like a natural part of the system.

The application was specifically developed to meet the needs of modern software development workflows. In my opinion, its standout feature is the seamless container support for tools like Podman, Distrobox, and Toolbox.

Ptyxis is rapidly gaining popularity across the Linux community. It has already become the default terminal for many modern distributions, including Fedora and the upcoming Ubuntu releases.

As I have been using it for some months now, let me share some of my favorite features in this new terminal. I hope you like them as much as I do.

📋
The screenshots in this article uses customized prompt. The default Ptyxis terminal doesn't look like this. You can get the config file on our GitHub repo or watch this video tutorial on terminal customization.

Tabs and Overview

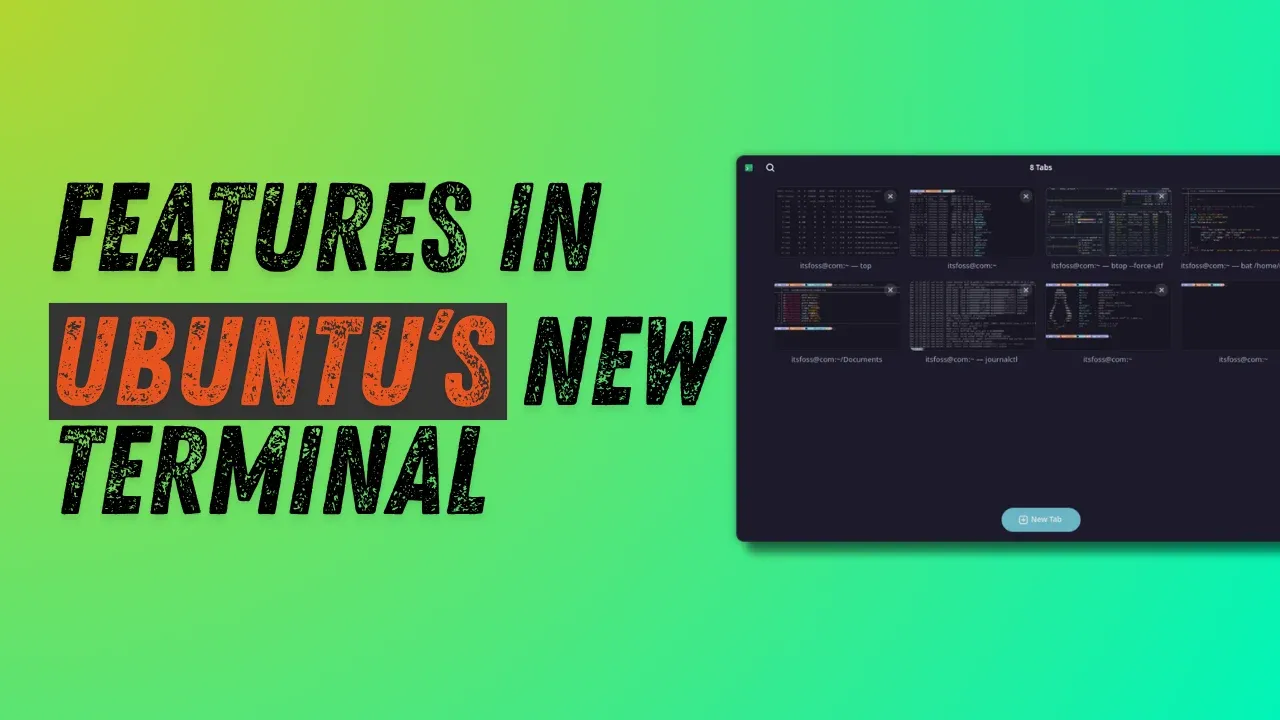
The first thing you notice when opening Ptyxis is the tabs and overview system. While other emulators like GNOME Terminal or Kitty use a standard tab bar, Ptyxis introduces a visual tab selector that feels very similar to the GNOME Activities overview.

A screenshot showing the tabs overview in Ptyxis terminal emulator.
Tabs Overview

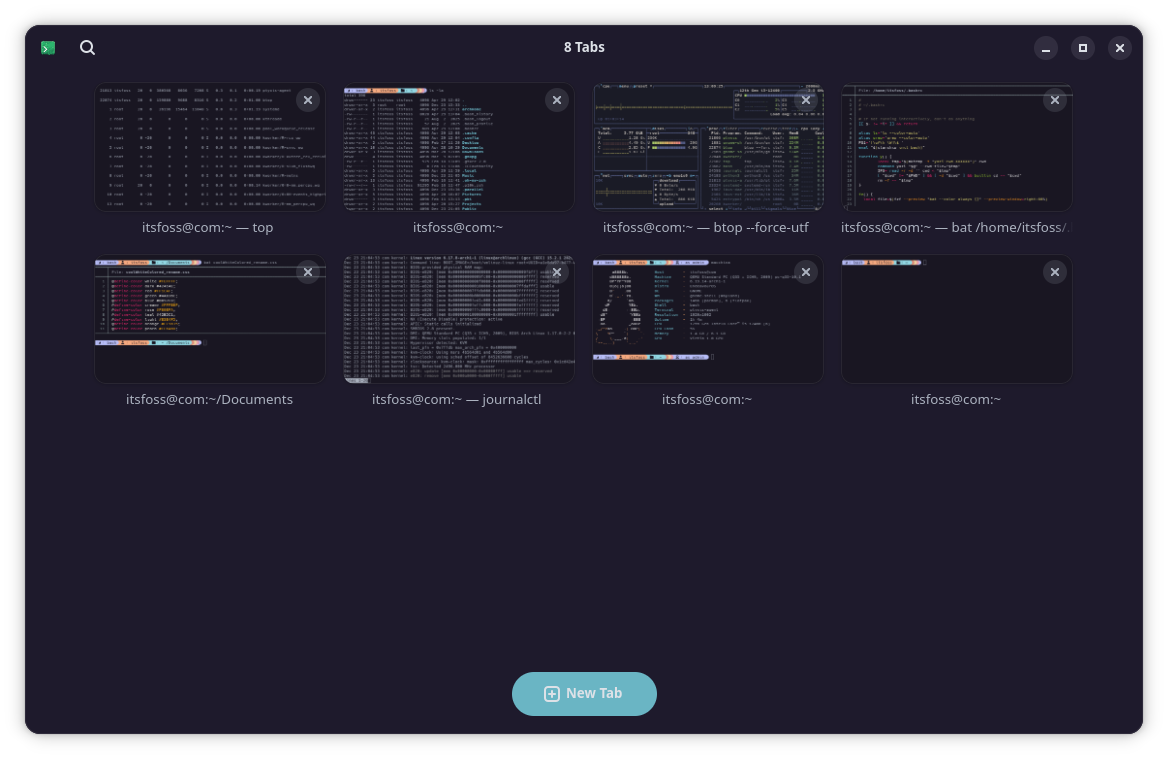
If you have multiple tabs open, you can simply click the Show open tabs button in the top-right of the title bar.

Click on the show open tabs button on the top-right of the title bar to open the Tab overview in Ptyxis terminal emulator.
Click on Tab Overview (Show open tabs) button

This opens an interface where each tab displays its title alongside a small preview, making it easy to see exactly what is running before you click back into a full view.

The flexibility here is excellent because you can drag and drop tabs in the overview to rearrange them.

Rearrange tabs by drag and drop

You can also pin important tabs to keep them visible at the top of the list at all times.

Pin tabs in overview

My favorite feature, however, is the ability to easily custom name your tabs and search through them later. By right-clicking a tab in the overview and selecting "Set title," you can choose to either prepend a name to the default process or create a completely custom title.

Renaming a tab in Ptyxis

Once your tabs are named, you can use the search button in the top-left of the title bar to find exactly what you need. This is incredibly helpful when you are managing a large number of active sessions simultaneously.

Search for Tabs in overview

📋
When you have multiple terminal sessions, the tab and overview feature helps a great deal in finding the right tab in the same application interface.

Color Schemes

A standout feature of Ptyxis is the support for a wide range of preset color schemes. You can access these options by opening the preferences window through the three-dots menu in the top-right of the title bar.

Open the Preferences window of the Ptyxis terminal emulator from the three dots menu button in the top-right of the title bar.
Open Preferences

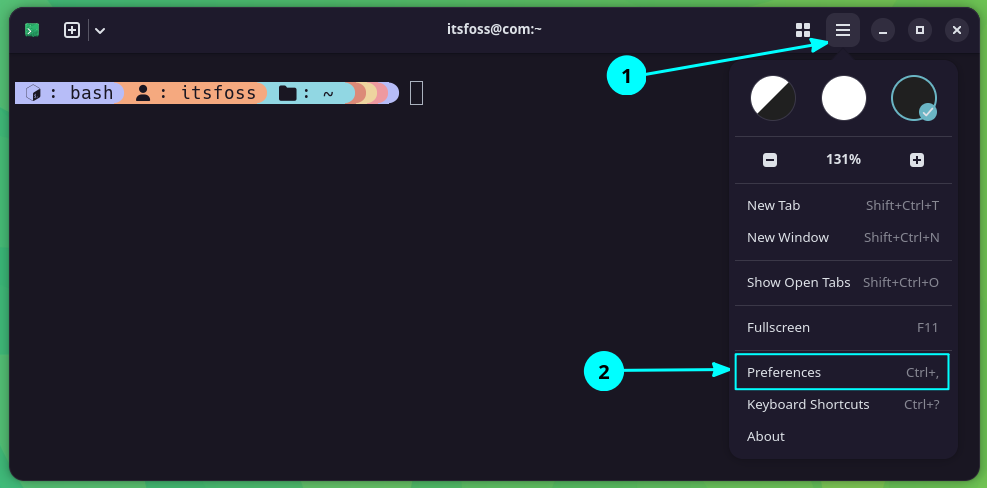
Once inside the Appearance tab, click on the "Show all palettes" option to see the full list. The interface provides a neat preview for each selection, and your chosen theme is applied immediately.

All color schemes in Ptyxis terminal.

In my opinion, the way these colors adapt is impressive. The scheme is applied intelligently to the tab bar as well, ensuring the entire terminal maintains a cohesive and professional look.

Among the vast list of options, I have a few specific favorites that I think look incredible. Omni, Pixiefloss, and Tomorrow Night, Ubuntu are all excellent choices that provide a very modern feel.

Themes applied in the order: Omni, Pixiefloss, Tomorrow Night, Ubuntu

📋
It's not just the dark and light mode. That's too simplistic. You have plenty of color themes to choose from.

Scrollback Search

The ability to search through what appears on your screen is a massive help during long sessions. While tools like grep are great for text files, you often need to find specific information directly within the shell scrollback.

For example, if you have displayed a massive log file using the cat command, you can quickly find what you need without re-running the command. By pressing SHIFT + CTRL + F, a search interface opens at the bottom of the terminal.

The scrollback search interface in the Ptyxis terminal emulator.
Scrollback Search Interface

The extra search filters provides better matching. You can choose to match case, match whole words, or even use regular expressions to narrow down your results.

Search criterias in Ptyxis terminal emulator, including match case, match whole words, and use regular expressions.
Scrollback Search Criteria

The interface includes simple navigation buttons to move up and down through your search matches. This makes it incredibly easy to jump between different instances of a term within a long output.

Searching in the Scrollback contents

📋
This has been a struggle in standard terminals. Finding text that has been displayed on the screen earlier is a good productivity booster for me.

Container Support

This is the flagship feature of Ptyxis. The terminal works directly with container technologies like Podman, Distrobox, and Toolbox to make your development workflow much smoother.

If your system has containers using these platforms, Ptyxis detects them automatically and provides a dedicated way to access them. You can simply click the dropdown button in the top-left of the title bar and select a specific container from the list to launch it instantly.

Enter a container using Dropdown menu

The ptyxis-agent coordinates with your system to handle the discovery and management of these environments. For example, if you are using Distrobox, Ptyxis will execute the proper run commands for you behind the scenes.

📋
The lack of Docker integration is surely a letdown. While you can still run Docker CLI commands manually, the terminal will not detect them automatically or allow you to enter them through the UI like it does for Podman. No matter how good Podman is, Docker is still omnipresent. I am lowkey disappointed that it cannot detect docker containers.

Profiles

Okay. This is not new. Almost all modern terminals support the profile feature and yet I think that profiles are the most underrated feature that many people often ignore.

How do they help? Let's say you want to try a new shell like ZSH, you can create a specific profile for it instead of changing your entire system shell. You could also create a dedicated profile for a terminal multiplexer like Zellij.

A list of custom profiles created in Ptyxis terminal. The screenshot shows the profiles page in preferences, that list all profiles available.
Custom Profiles

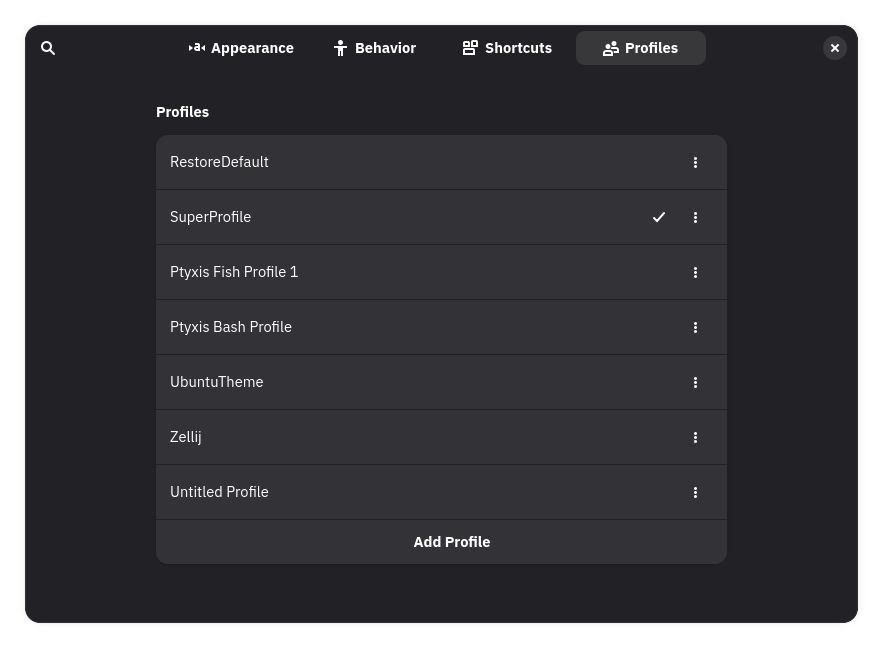
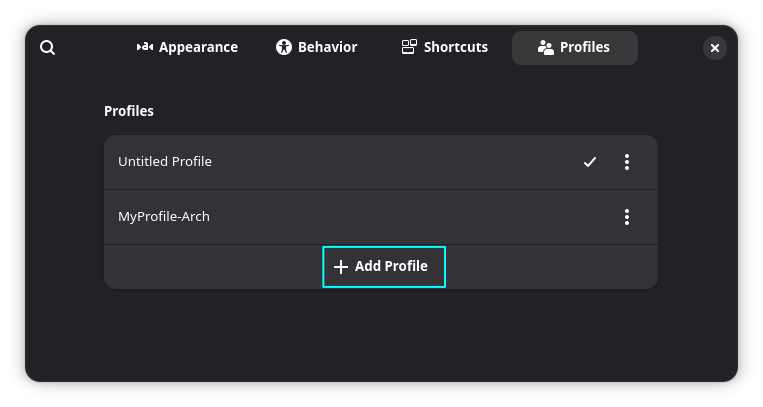
Ptyxis has excellent support for profile creation and management. You can find these options in the Profile section of the Preferences window.

By default, you will only see an Untitled Profile, but you can use the Add Profile button to create something new. The profile creation dialog is vast and offers many different options.

Click on the Add Profile button to create a new custom profile in Ptyxis.
Click on Add Profile button

You can set specific color schemes, choose a custom shell, or even assign a default container to a profile. For example, I can create a profile that automatically opens my Ubuntu Distrobox container every time I launch it.

Once your profiles are set up, you can set one as the default for all future terminals. Alternatively, you can quickly switch between your different profiles using the dropdown menu in the title bar.

💡
I suggest that you do not alter the default profile. This will be very beneficial if you ever mess up a configuration and need to restore the original behavior.

Context Awareness

Ptyxis can intelligently identify your current context, such as active root privileged windows or SSH connections. This provides immediate visual feedback about the environment you are working in.

For example, if you run a command using sudo, the title bar of the terminal turns red to notify you of the changed privilege level. If you log in as the root user, the title bar remains red until you finally log out.

0:00
/0:11

Ptyxis titlebar color change for previlieged windows.

📋
In my opinion, this is an excellent communication method for the user. it provides a clear warning about the caution needed while interacting with the terminal in a high-privilege state.

Some hidden gems

Apart from the major features I mentioned above, Ptyxis also has a few more tiny functions that deserve attention. The Shortcuts option in the Preferences window allows you to alter existing keyboard combinations or add new ones for various terminal actions.

The Shortcuts page in the Preferences window allow you to change the existing shortcuts or add new shortcuts to various terminal actions.

An advanced addition is the Terminal Inspector. This tool allows you to monitor exactly what is running in the terminal at any given moment, which is a massive advantage for developers.

Ptyxis terminal inspector

You can use the inspector to track underlying shell processes, monitor mouse pointer locations, and even peek at OSC (Operating System Command) hyperlinks. It is a specialized feature that makes debugging terminal-based applications much easier than before.

I can see why Ubuntu and Fedora made it default

Ptyxis is a good upgrade from the classic GNOME Terminal. While the container integration might not be for everyone, the app has significantly improved many day-to-day features that improve the overall experience.

What do you think about this new terminal emulator? Will you use it as your main terminal, or are you sticking with your current favorite? Share your opinions in the comments section!

7 Features I Like in Ptyxis (The New Default Ubuntu Terminal)

✇It's FOSS

10 Things Linux Can Do That Windows Still Can’t

Von: Roland Taylor

We all know Linux gives us a world of freedoms we couldn't possibly have on Windows, but have you ever stopped to think about that freedom in real, qualitative terms? After all, when most people say they can't switch to Linux, it's usually because of something they just can't do without Windows or macOS or Android (which itself is Linux, even if most don't consider it such).

So, let's take a closer look at some of the things you can do on/with a Linux system that you just can't typically do on Windows.

1. Live USB/Live session

The Ubuntu 24.04 welcome screen showing the language selection tab
Running Ubuntu 24.04 in a live session

It goes without saying that this one deserves the #1 spot on this list. After all, for most of us, our first experience with Linux was at the welcome screen of a live session from a USB, SD card, or, in the past, CD or DVD. If you go even further back, some of us (myself included) first got to know Linux through the likes of Damn Small Linux running a live session inside Windows itself.

The crazy thing? Live CDs have been a part of the Linux experience since the early 90s, when we still regularly used floppy drives! And yes, live floppies were a thing, too. In fact, they still are.

Not only is there no official way to run Windows as a live session out the box, but Microsoft's own live session solution, Windows To Go, was an enterprise-only solution and has been discontinued. Non-standard solutions exist, but these are on shaky ground in that they rely on creating a Windows install on portable media, which is something Microsoft hasn't sanctioned.

2. Login screen customization

The GDM login screen showing the author's user account ready for sign-in to a Fedora system
The GDM login screen comes by default on GNOME-based systems

No lie, this one blew me away when I first switched to Linux from Windows. I'd always loved the idea of customising my system's visuals, and the fact I couldn't do this easily on Windows was a source of frustration. So to come from a world where I needed to risk malware or pay a fee just to put a wallpaper on the login screen to the full-scale flexibility of Linux has never stopped being amazing.

Not only can you change your wallpaper, but you can change the layout, even swap out the login manager altogether. Don't like the layout and style of GDM? Try SDDM or LightDM for greater flexibility, or even Ly, if you prefer something terminal-based. As a matter of fact, you can completely ditch the login manager altogether and boot straight to a TTY or desktop environment if you desire.

While you can change your wallpaper on recent releases of Windows, customising your login screen beyond this or changing your login manager altogether is simply not possible. After all, Microsoft wants you to log in with your Microsoft account going forward, so a third-party solution would somehow need to account for this.

3. Changing your desktop environment

A screenshot of the COSMIC desktop environment running on Ubuntu 24.04
COSM Desktop running on Ubuntu 24.04

Maybe I shouldn't even say "desktop environment" here, because let's be honest — Linux has way more than just desktop environments for us to play with. We've got a broad selection of window managers (compositors, with the rise of Wayland), desktop environments, desktop-independent panels, docks, you name it. Whether you want to do minimal bling with Wayfire or Hyprland, or sink your teeth into something beefy with Plasma or GNOME, the choice is yours.

You can customise your layout, app selection, software store, launchers, or whatever you like, and you won't be penalised for it, nor do you have to pay a dime or risk giving your data to a company that could go defunct and leave you hanging.

Can you change your desktop environment or window manager on Windows? Nope. Sure, you can use third-party tools to achieve some degree of customisation, but these methods are not officially supported and may even violate the operating system's terms of use. Many of these customisations break standard features in Explorer or other parts of the system and can easily fail when Microsoft releases routine updates.

4. Use the system without a GUI

The Fedora CoreOS login prompt
Fedora CoreOS is designed to run with no GUI

Whether it's booting to the recovery session, running with the login manager disabled, or using a headless install through SSH, there are many ways you can use Linux on real hardware without ever using a graphical interface of any sort. While this option may not appeal to the majority of "average" users, it's still a pretty important distinction. You can use Linux as minimally as you need, even if it's as a temporary solution to bring up your graphical system just as you'd prefer.

For instance, this is the standard way to install Arch, by the way, and you can customise just about any distro to function in the same way even after installation. What makes this possible is the fact that what we know as "Linux" is actually a collection of software: the kernel, GNU utilities, init systems, and more. By choosing exactly what combination of software you're using, you can set up a minimal system that requires no graphical components whatsoever and still directly or remotely execute software from the system. It's even possible to set up such a system to display graphics over the network.

In the case of Windows (for consumers), this pathway isn't supported whatsoever. If something goes wrong, recovery is typically a graphical affair. Even Safe Mode is primarily designed around this. Running Windows as a text-based operating system just isn't something the average consumer can do.

5. Install it on just about anything

A close up of someone checking their smartwatch with one hand crossed over the other. Green grass in the background, blurred. The visible hand has red nail polish, with the 4th finger having pink nail polish.
Pexels / www.kaboompics.com

Linux on a fridge? A toaster? A toothbrush? Yes. And it probably can run Doom, too. The reality is, Linux is so flexible and portable, it can run on just about any device with a processor, even a tiny microcontroller. From the world's most powerful supercomputers to some of the smallest single-board computers and Internet of Things (IoT) devices, Linux has grown to basically power the majority of the digital world. There are even custom distributions for many non-standard devices, from game consoles to smartwatches, and the list just keeps growing.

On the contrary, while Windows has spread to some other devices over the years, it's not anywhere near the level of portability we have with Linux. You can't just grab a Windows ARM ISO and install it on a Raspberry Pi. You can't put Windows on a smart fridge either, unless the manufacturer happens to have an existing agreement and collaboration with Microsoft. Plus, since Windows is objectively not open-source, the community can't port it on their own.

Linux on the other hand, we can take wherever we want, not only because it's open-source but also because it was built with portability in mind. It can easily be stripped down and streamlined to fit just about any hardware. That's a freedom we just don't have with Windows.

6. Move your Linux install between systems

An office setting with white walls and various computer monitors behind different cubicles, alonig with headsets and other peripherals
Pexels / Pixabay

You might not have ever considered this, but really think about it. Let's say your current laptop or workstation goes down, maybe because the CPU burnt out or the motherboard got damaged, but the SSD is still working just fine. With Windows, it's time to get a new licence. You can certainly recover your files, provided your drive wasn't encrypted, but it's unlikely you're sticking that SSD in another system, booting it up, and continuing on like nothing happened. The bad news is, this is getting even harder with the introduction of mandatory Microsoft accounts attached to your system's TPM chip.

With Linux on the other hand, that's actually a pretty common workflow. I know this first-hand, because I've done it with multiple systems in the past. Sure, if you've got proprietary drivers installed, you may need to ensure that you remove them if your hardware differs too strongly, especially in the case of graphics cards.

Yet, Linux won't just automatically give up and quit if your drivers don't match your hardware. Instead, it'll choose a fallback method or fail to a command-line interface until you get that sorted out. It's a fascinating experience once you actually try it (or are forced to do it).

7. Customize or even swap your kernel

A simulated boot screen showing kernels 7.0, 6.2, Real Time Kernel 6.3 and "Custom Build (Performance)" as options
A simulated boot screen – perhaps someone wants to make this theme?

Imagine one day you wake up and decide you need to swap your kernel for a more optimised workflow. It could go something like this:

"Hmm, let's see here, should I run the Liquorix kernel today or the real-time kernel? How about the mainline kernel? Choices, choices..."

This is one thing long-time Linux users may take for granted, but it's actually a pretty big deal that we can do this in the first place. Again, this is made possible not only by the open-source nature of the kernel but also by the modular nature of most of the distributions we use. As a result of this modular nature, we can swap kernels any time we need to, especially so long as the distribution we're using provides a method for doing this.

🗒️
Immutable systems may have different restrictions or methods for changing the kernel.

Why might you need a different kernel? Well, it can be for any number of reasons, but typically, it's down to two main needs: better driver support and better performance. Newer kernels typically have broader support for new hardware, but sometimes an older kernel may also be needed for a specific device or quirk. Likewise, performance can vary with different kernel versions and build-time configurations.

Needless to say, this isn't something a normal user can do on Windows beyond applying standard updates. Yet on Linux, it's something so normal as to not even feel remarkable.

8. Choose different filesystems during installation

The "Advanced Features" sceen in the Disk setup screen of the Ubuntu 24.04 installer
Choosing disk options in the Ubuntu 24.04 installer. The ZFS file system is available as an option.

Windows supports a few filesystems for reading/writing files, including the typical FAT and EXFAT filesystems, NTFS, and more recently, ReFS, which is more used for server environments. However, when it comes time to actually install the system your options are pretty limited. You can install your main system on an NTFS filesystem, and with the exception of the FAT32 EFI partition, that's about it. No other filesystems are supported out the box, and while Windows setup supports loading third-party drivers, this doesn't cleanly open the door to installing Windows on any non-standard filesystems.

On the other hand, Linux supports many filesystems by default, and most distros give you the option to install on a much broader selection of them. Most offer at least the option of using ext4 or Btrfs, with some, such as Fedora, offering additional options, like XFS. In theory, you can even move your Linux install from one filesystem to another, provided you have the knowhow. For instance, btrfs-convert lets you convert an existing ext2, ext3, or ext4 installation to Btrfs.

9. Revive older hardware

Damn small Linux showing the settings screen
Damn Small Linux 2024 is designed specifically to run on older hardware

Windows is notorious for its tendency to introduce seemingly unnecessary, forced hardware requirements that stop users from being able to keep using their older hardware, even when testing proves that Windows would run on it just fine. With Windows 11, things have never been worse. Perfectly powerful systems from as recently as 2017 or 2018 are somehow not supported all because of Microsoft's tighter hardware requirements, including requiring a TPM 2.0 chip, Secure Boot, and other platform features that can sometimes just barely edge a system out.

It gets worse when you consider the bloat that's been steadily creeping (or pouring) into Windows over the decades. Since users don't have any right to control what's in Windows by default or create their own official "Windows distribution", there's no way around this.

Not so with Linux, as many are discovering, and as you may have seen earlier with Linux running live off a floppy disk. In fact, there are Linux distributions especially built for this very reason, such as Puppy Linux and antiX, which the modern DSL 2024 is based on. Furthermore, Linux can be compiled specifically for older systems, even those with 32bit processors, unlike Windows, which typically drops older hardware with no way back.

10. Swap parts of your stack, as you wish

We've already talked about how you can swap your desktop environment, login manager, and kernel, but to end off this list, I think we should dig a little deeper. Unlike Windows which basically dictates what your operating system stack is from the ground up and provides few options for change, Linux gives you freedom change pretty much everything. For instance, let's say you're running Ubuntu and you really don't like snaps. Solution? Remove snapd.

You're probably thinking "But won't snapd just reinstall itself on the next update?", and the answer is no, but even if that were the case, you could block the update by locking the package. You can also change your init system, audio system, display system (betwen X11 and Wayland, and now the various forks of X11 that have popped up since it was all-but-abandoned).

Put simply, whatever you don't like about Linux, technically, you can change it. You just have to know how to do it and what to do if something goes wrong along the way. In some cases, there are even scripts that can automate the process for you, or distributions that do exactly what it is you're looking for already. For example, there's Devuan for Debian users who don't want systemd.

While unofficial "builds" of Windows exist, such as Tiny 11, most of these taking risk by distributing modified ISOs of Microsoft's intellectual property. It's legally gray at best, but it's pretty much the only option for many users.

Final thoughts: The narrative needs to flip

The text "FLIP THE SCRIPT" on a wavy background of pale green and blue hues
That's it. That's the message.

I could've kept this list going even longer, but I think the point is clear. While there are legitimate grievances like software that hasn't been ported yet, or challenges with hardware that vendors haven't provided drivers for, the reality is that Linux has a lot going for it if you stop to give it a fair shake.

If you've not yet tried Linux, maybe now's a good time to see what all the hype's about (and I don't just mean Hyprland, all though that's pretty sweet too). There's a lot you can do just fine on Linux that you can't actually do on Windows, or if you can, it's definitely not a walk in the park, whereas for us Linux denizens, it's just another part of daily life.

If you ask my advice, I say go for it: see what you've been missing, and you might just get hooked over this side too.

10 Things Linux Can Do That Windows Still Can’t

✇It's FOSS

New to Linux? These 4 systemd Tools Help You Fix Common Issues

Von: Neville Ondara

If you’ve spent any time in the Linux community, you know that systemd is a hot topic. Some people love it because it handles everything; others wish it didn't! But here’s the reality: almost every major Linux distribution (like Ubuntu, Fedora, and Debian) uses it today.

Think of systemd as the "manager" of your computer. When something goes wrong, like your Wi-Fi won't connect or a creative app keeps crashing, systemd is the one with all the answers.

But where to find those answers? systemd has built-in tools that help you troubleshoot issues with your system. If you’re just starting your Linux journey, I recommend exploring the following four tools.

📋
If you are ensure, please check if your Linux system uses systemd.

1. Systemctl

In Linux, background apps are called services. If your system is not accepting SSH connections, you use systemctl to see what’s happening under the hood.

I mean, before you try to fix something, you need to know if it's actually broken.

sudo systemctl status ssh

This is the most important command in a Linux user’s toolkit. When you run it, pay attention to the Active line:

  • Active (running): Everything is great!
  • Inactive (dead): The service is off. Maybe it crashed, or maybe you never turned it on.
  • Failed: This is the red flag. systemd will usually give you a "Main PID" (Process ID) and a reason for the failure right there in the terminal.
Systemctl status output, showing process IDs and recent log events for a running service.

The "turn it off and on again" trick

We’ve all heard it: "Have you tried restarting it?" Restart a service in Linux with systemctl.

  • Kickstart a failed one: sudo systemctl start ssh
  • Stop a lagging service: sudo systemctl stop ssh
  • Reset: sudo systemctl restart ssh
  • Disable a service (to speed up boot): sudo systemctl disable ssh

2. Journalctl

When an app crashes, it doesn't just vanish. It usually screams an error message into the void. Journalctl is the tool that catches those screams and saves them in a "journal" for you to read later.

Unlike old-school Linux logs (which were scattered across dozens of text files), systemd keeps everything in one central, encrypted location.

Filtering the noise

If you just type journalctl, you’ll see thousands of lines of code, most of it is boring stuff like "System time updated." To be a good detective, you need to filter:

journalctl -xe
  • -x: Adds "catalog" info (it explains the errors in plain English).
  • -e: Jumps straight to the end of the log so you see the newest stuff first.
Using the journalctl -xe to jump to the most recent system logs

Targeting a Specific App: If you want to check the issue with a specific app, don't read everything, just read the entries for that specific app:

journalctl -u ssh
Filtering system logs for a specific unit using the -u flag

Time Travel: Did your computer freeze two hours ago? You can ask the journal to show you only that time frame:

journalctl --since "2 hours ago"
Using time filters in journalctl allows you to pinpoint exactly what happened during a system freeze

3. Systemd-analyze

Is your computer taking forever to start up? Instead of guessing which app is slowing you down, you can ask systemd-analyze to blame the culprit. This tool measures every millisecond of your boot process and tells you exactly which service is holding things up.

Run this command to see a ranked list of the slowest-starting apps:

systemd-analyze blame

You might find that a "Modem Manager" you don't even use is taking 2 minutes to start. This gives you the power to disable it and save time every time you turn on your PC.

The blame command identifies exactly which services are slowing down your Linux boot time

Additionally, some apps can't start until other apps are finished. If App A waits for App B, it creates a chain.

systemd-analyze critical-chain

This shows you the path systemd took to reach your desktop. If one link in the chain is slow, the whole system feels sluggish. You can learn more about optimizing Linux boot speed in our dedicated guide.

The critical-chain command reveals the 'relay race' of your system startup.
🚧
systemctl status, journalctl, and systemd-analyze are 100% safe. They are "read-only." However, be careful with sudo systemctl stop. If you stop a service like dbus or systemd-logind, your screen might freeze or you might get logged out!

4. Coredumpctl

Sometimes, an app doesn't just have an error, it crashes completely. In programmer terms, it "dumped its core." This means the app threw its entire memory onto the floor and quit.

Coredumpctl is like a forensic investigator. It lets you look at that memory "snapshot" to see what the app was doing right before it died.

Listing the crashes

To see a table of every app that has crashed on your system recently, use:

coredumpctl list
The coredumpctl list command displays a table of recorded application crashes, including time, PID, and executable name.

The "Detective Report"

If you see that your favorite app crashed, you can get the full report by using its Process ID (PID) from the list:

coredumpctl info [PID]

This will show you things like the "Signal" (usually SIGSEGV, which means the app tried to touch memory it wasn't allowed to) and a "Stack Trace" (the last few functions the app ran).

💡
Some distributions (like minimal Debian installs) might not have coredumpctl installed by default. You can usually get it by running sudo apt install systemd-coredump.

Conclusion

By using these systemd tools, you’ve moved past the "I'll just reboot and hope for the best" stage. You can now see the status of your apps, read their logs, speed up your boot time, and investigate crashes like a seasoned Linux user.

Next time something feels "off" on your Linux machine, don't panic. Just remember: systemctl for the status, journalctl for the logs, systemd-analyze for the speed, and coredumpctl for the crash.

  • Es gibt keine weiteren Artikel
❌